Thursday, October 30, 2008

Halloween-- Pumpkin Chocolate Treats

halloween cupcake

Are you ready for the sugar-rush that will come upon us on Friday? My little clan includes: a witch, twins posing as each other, and a little boy who turned into a venus flytrap.
I've never noticed that sugar had an effect on my children, although some of my friends might disagree. I prefer to stay delusional on Halloween night and let them have some fun.

I moved from France to California with my family when I was ten. It was the week before Halloween. Although I did not speak English yet, I quickly learned how to say: "trick or treat". I remember that night vividly in all its magic. People made their own costumes back then--no, it wasn't that long ago. The neighbors all knew each other and welcomed you with candies and smiles.

This year, we're getting together with some friends for a casual dinner and the usual Halloween festivities. I hope your Halloween is merry and magical.

halloween lonely cupcake

For this recipe, I was inspired by the Pumpkin Chocolate Chunk Bars I saw on Eggs on Sunday. I decided to make them with olive oil instead of butter. I know it sounds strange, but olive oil is wonderful at mimicking the richness of butter while blending into your baked-goods. I also altered the recipe to make it gluten-free. Instead of making them into bars, I decided to pour the cake batter into individual cups to make it easier for the kids at my son's Halloween party.

Halloween treats


Pumpkin Chocolate Treats (makes 12)
These treats are more like a cake than a muffin. They are incredibly moist and delicious.

1/2 cup olive oil
3/4 cup brown sugar
1 egg
1 tsp GF vanilla extract
3/4 cup pumpkin puree
1/2 cup brown rice flour
1/4 cup tapioca starch
1/4 cup sorghum flour
1/4 tsp xantham gum
1 tsp ground cinnamon
1/4 tsp salt
1/4 tsp ground ginger
1/4 tsp ground allspice
1/4 cup GF chocolate chips

Orange decorative sugar (optional/I use an all natural product)

Preheat oven 375F
Prepare muffin pan, and paper liners.

Mix all the dry ingredients, except for the chocolate chips, in a bowl.
Place the olive oil and sugar in a mixer and combine until smooth and fluffy (3 minutes).
Add egg and vanilla to sugar mixture and mix some more.
Add Pumpkin puree and stir until evenly distributed.
Little by little add the dry ingredients to the wet ingredients until batter is well comined. Add chocolate chips. Distribute the batter evenly into the muffin cups. Sprinkle a little bit of the orange sugar on top of each muffin and bake for 20 minutes or until a skewer comes out clean when inserted in the center of muffin. Let cool.


halloween treats inside look

And because it's Halloween tomorrow, here are some more treats...

GF Cranberry Pistachio Mexican Wedding Cookies
Cardamom Dark Chocolate Cookies

Wednesday, October 29, 2008

Daring Bakers October: Fabulous Pizza

balsamic tomato & corn pizza

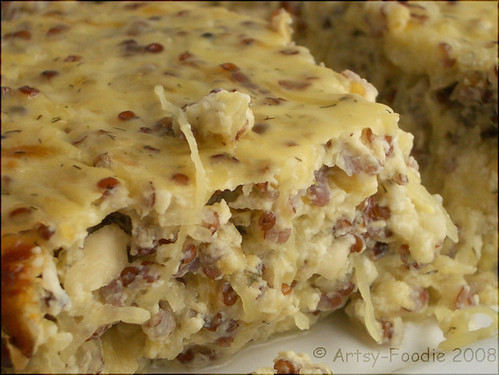
My second Daring Bakers' challenge was to make the ultimate pizza with my choice of toppings. Rosa was kind enough to provide the detailed instructions for this month's event. The goal was to toss the pizza dough up in the air like a professional. Rosa added an extra challenge: participants were to take pictures or film themselves during this process.

Sadly, tossing the dough was not a possibility for me. Gluten is what gives dough its elasticity; without it you're left with only one option: to roll out the dough.

balsamic tomato pizza eaten

The dough requires some advance planning. I made it the day before and it waited patiently its required 24 hours in the fridge. I was inspired by the fresh produce from my CSA for the toppings. My family enjoyed both versions and I hope you will too.

Don't forget to visit the rest of the Daring Bakers... You'll enjoy the creativity and originality. Thank you Rosa for your wonderful instructions and enthusiasm!

Here's the recipe for the pizza dough as it was given:
~ BASIC PIZZA DOUGH ~
Original recipe taken from “The Bread Baker’s Apprentice” by Peter Reinhart.
Makes 6 pizza crusts (about 9-12 inches/23-30 cm in diameter).

Ingredients:
4 ½ cups GF Flour Blend with xanthan gum or 1 cup brown rice flour, 1 cup corn flour, 1 cup oat flour, 1 ½ cup arrowroot, potato or tapioca starch + 2 tsp xanthan or guar gum
1 3/4 Tsp Salt
1 Tsp Instant yeast - FOR GF use 2 tsp
1/4 Cup (2 ounces/60g) Olive oil or vegetable oil (both optional, but it’s better with)
1 3/4 Cups (14 ounces/420g or 420ml) Water, ice cold (40° F/4.5° C)
1 Tb sugar - FOR GF use agave syrup
Semolina/durum flour or cornmeal for dusting


DAY ONE
Method:
1. Mix together the flour, salt and instant yeast in a big bowl (or in the bowl of your stand mixer).
2. Add the oil, sugar or agave syrup and cold water, then mix well (with the help of a large wooden spoon or with the paddle attachment, on low speed) in order to form a sticky ball of dough.

3. Flour a work surface or counter. Line a jelly pan with baking paper/parchment. Lightly oil the paper.

4. With the help of a metal or plastic dough scraper, cut the dough into 6 equal pieces (or larger if you want to make larger pizzas).

NOTE: To avoid the dough from sticking to the scraper, dip the scraper into water between cuts.

5. Sprinkle some flour over the dough. Make sure your hands are dry and then flour them. Gently round each piece into a ball.

NOTE: If the dough sticks to your hands, then dip your hands into the flour again.

6. Transfer the dough balls to the lined jelly pan and mist them generously with spray oil. Slip the pan into plastic bag or enclose in plastic food wrap.

7. Put the pan into the refrigerator and let the dough rest overnight or for up to thee days.

NOTE: You can store the dough balls in a zippered freezer bag if you want to save some of the dough for any future baking. In that case, pour some oil(a few tablespooons only) in a medium bowl and dip each dough ball into the oil, so that it is completely covered in oil. Then put each ball into a separate bag. Store the bags in the freezer for no longer than 3 months. The day before you plan to make pizza, remember to transfer the dough balls from the freezer to the refrigerator.

DAY TWO
8. On the day you plan to eat pizza, exactly 2 hours before you make it, remove the number of desired dough balls from the refrigerator. Place on a sheet of parchment paper and sprinkle with a gluten free flour. Delicately press the dough into disks about ½ inch/1.3 cm thick and 5 inches/12.7 cm in diameter. Sprinkle the dough with flour, mist it again with spray oil. Lightly cover the dough round with a sheet of parchment paper and allow to rest for 2 hours.

9. At least 45 minutes before making the pizza, place a baking stone on the lower third of the oven. Preheat the oven as hot as possible (500° F/260° C).

NOTE: If you do not have a baking stone, then use the back of a jelly pan. Do not preheat the pan.

10. Press the dough into the shape you want (about 9-12 inches/23-30 cm in diameter - for a 6 ounces/180g piece of dough).
11. Lightly top it with sweet or savory toppings of your choice.
12. Place the garnished pizza on the parchment paper onto the stone in the oven or bake directly on the jelly pan. Close the door and bake for about 5-8 minutes.

eggplant pine-nut pizza close-up

NOTE: Remember that the best pizzas are topped not too generously. No more than 3 or 4 toppings (including sauce and cheese) are sufficient.
13. Follow the notes for this step.

NOTE: After 2 minutes baking, take a peek. For an even baking, rotate 180°.

If the top gets done before the bottom, you will need to move the stone or jelly pane to a lower shelf before the next round. On the contrary, if the bottom crisps before the cheese caramelizes, then you will need to raise the stone or jelly.

14. Take the pizza out of the oven and transfer it to a cutting board or your plate. In order to allow the cheese to set a little, wait 3-5 minutes before slicing or serving.


Here are my recipes for two fantastic pizza pies. These delectable toppings can be made ahead of time and refrigerated until ready to use.


Eggplant pine-nut pizza


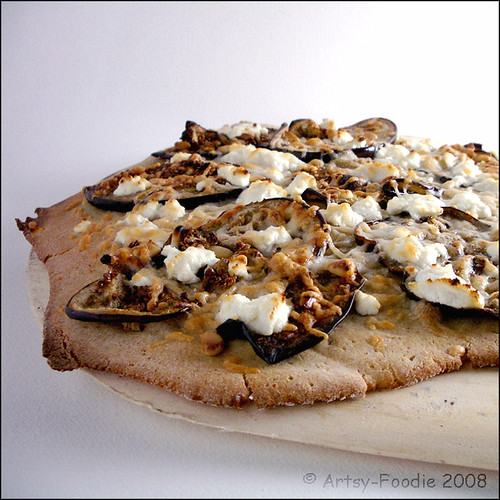
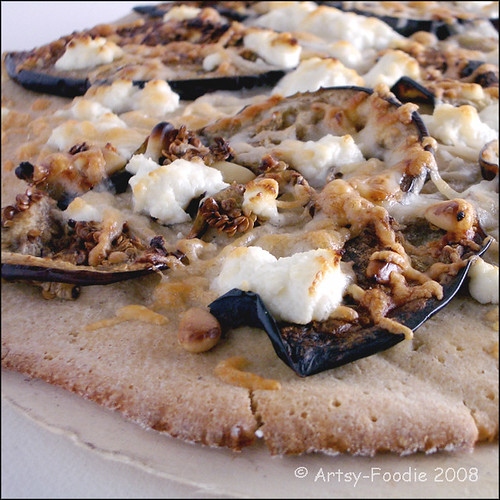
Eggplant, Goat Cheese and Pine Nut Topping
1 eggplant, sliced thin and salted
olive oil
olive oil spray
1/4 cup pine nuts
1/4 crumbled goat cheese


375F preheated oven
Coat a cookie sheet with olive oil. Spray the eggplant slices with olive oil on both sides. Spread the eggplant slices and pine nuts on it and bake in hot oven until cooked through and golden (about 20 minutes but watch it carefully so it doesn't burn.
Spread goat cheese on pizza crust, followed by the eggplant slices and the pine nuts. Bake the pizza in a really hot oven until cheese is hot and a little bubbly.


balsamic tomato pizza close-up


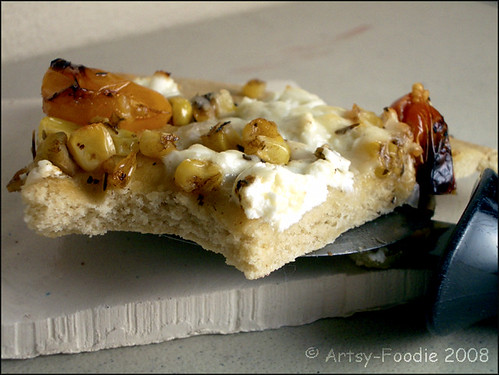
Balsamic Corn-Tomato Topping with Goat Cheese

1 1/2 cups sweet cherry tomatoes
1/2 cup fresh corn kernels
1 tablespoon olive oil
1 teaspoon herbes de provence
1/4 teaspoon salt
2 teaspoons balsamic vinegar
1/4 cup crumbled goat cheese


Preheat oven to 375F
Combine all the ingredients in a ceramic pie dish and bake for 30 minutes
Spread over the pizza dough followed by the goat cheese. Bake in a really hot oven until crust is crisp and topping is hot and bubbly (about 10 minutes).


balsamic tomato pizza slice

Tuesday, October 28, 2008

Pumpkin Dal with Rice

legume-dal-with-rice-served

My family loves legumes. We enjoy them in a variety of dishes from salads to comforting stews. They're an easy way to create a satisfying vegetarian course full of flavor and protein. The advantages of making them a staple in your meal-planning go beyond good taste--they are economical as well.

legume dal in bowl

Legumes are fruits that have been dried. In France, the word "legume" means vegetable, while in the english language it identifies specifically the dried fruits inside pods. Its wide-spread use is not surprising. One can imagine how easy it would have been for different varieties to cross borders, as people migrated. Through-out history, it has been used as an excellent source of protein or an extender when meat was scarce. From the tiny lentil to the fatty peanut, they vary widely in size, taste, fat content and texture.

This recipe is a perfect example of how you can turn legumes into a fantastic meal. It features split peas and chana dal, as well as creamy pumpkin, an array of spices and fragrant basmati rice.

legume dal rice bowl served

Legume Puree with Pumpkin and Rice (serves 6-8)
If you cannot find chana dal (available at natural/health food stores and Indian markets), replace it with some yellow split peas instead and proceed as per the recipe.

1 cup chana dal
1 cup green spilt peas
4 cups diced pumpkin, or butternut squash
1 tsp ground turmeric
1/4 tsp ground cumin
1 tablespoon dried funegreek leaves

4 cups water
1 tablespoon olive oil
1 tsp black mustard seeds
1 tsp cumin seeds
1 1/2 tsp salt
2 cups cooked basmati rice

Yogurt Sauce:
1 cup plain yogurt (I favor goat yogurt)
1 1/2 tablespoon lime juice
1 tsp salt
1 tsp chaat masala seasoning (available in international or indian markets)


Soak the chana dal and split peas overnight. Rinse well. Transfer to large pot with diced pumpkin, turmeric, ground cumin, water and bring to a boil. Cover and simmer for 30 minutes or until the peas, beans and pumpkin are very tender.

In a small pan, heat the oil. Add the mustard seeds and cumin seeds. Saute until they start to sizzle and crackle. Pour fragrant mixture into the dal pot along with the cooked rice. Mix well. Let simmer, uncovered, until the mixture thickens slightly. Make sure you mix often.

Make the yogurt sauce by mixing all the ingredients in a bowl (keep refrigerated until ready to serve with the dal).

Serve the dal/rice mixture in a bowl, topped with a generous spoon of the yogurt sauce.

legume rice dal close-up


Artsy-Foodie's Announcement:
During this busy time of the year, in order to keep up the quality of my posts, I feel the need to go to biweekly postings. From now on, I will be posting on Tuesdays and Thursdays, and additionally for special events such as Daring Bakers. I have some wonderful recipes in the works-- I look forward to sharing them with you.


More legume recipes:
Edamame Avocado Spread
Black Lentil Soup with Kale and turnip chips

Friday, October 24, 2008

Keeping It Fun with Acorn Squash

Acorn squash sliced

Eating locally means going with the best the season has to offer. I receive a box from my CSA farm every week. Summers are so easy and bountiful, Autumn is more of a challenge for me. There is only so much winter squash I can eat before I start to crave the stunning greens of Spring and Summer. My solution is to diversify how I prepare the Fall cornucopia that crosses the threshold of my kitchen.

acorn squash miso platter

There are many recipes on the internet for eggplant glazed with miso. I decided to take the concept and apply it to the humble acorn squash. I had the perfect miso glaze in my recipe box. The saltiness of the miso brings out the natural sweetness of the squash while the sesame seeds add visual appeal. This beautiful dish would make a great addition to any Autumn meal.

acorn miso top view

Miso Glazed Acorn Squash (serves 4)
This dish can be made with any firm fleshed winter squash.

1 acorn squash, seeded and quartered

1/4 cup white miso
2 tablespoons rice vinegar
2 tablespoons water
1 teaspoon fresh grated ginger
2 tablespoons agave nectar

2 tablespoons black sesame seeds

acorn squash with miso glaze

Preheat oven to 400F
oil cookie-sheet or baking dish

In a bowl, mix well: miso, vinegar, water, ginger, and agave nectar.
Place the squash skin down onto your oiled dish. Coat the squash with the miso glaze, letting it puddle in the center. Sprinkle the sesame seeds over the whole thing.

Bake for 30 minutes and then carefully, using a soup spoon, reglaze the squash using the puddled marinade in the center of each quarter. Bake for another 30 minutes or until the squash in started to look golden and is cooked through (check by inserting a toothpick or small knife in one of the pieces. It should go in easily)

acorn miso baked close-up


More squash recipe...
Spaghetti Squash and Quinoa Bake
Pumpkin Butter with Candied Ginger

Thursday, October 23, 2008

Apricot Sesame Marinade for Fish

artsy-foodie fishing

My oldest child used to enjoy eating fish until he was about 3. Then, all of a sudden he found it too fishy and mushy. I struck a bargain with him: he had to try one bite. If he didn't like it, he didn't have to eat any more. I've found that picky fish-eaters do better with the firm texture and the mild taste of Tilapia, Mahi Mahi and Halibut. Flavoring the fish is key.

fish marinating happily

This recipe is so easy to put together and yields wonderful results. It goes really well with any white fish or salmon fillet. Assemble it in the morning or half an hour before dinner; either way turns out delicious.

fish marinade

Apricot Sesame Marinade for Fish (coats 2-3 lbs of fish fillets)
This marinade is equally delicious over some firm tofu.

1/4 cup fruit sweetened apricot jam
1/4 cup GF dijon mustard
1 tablespoon GF soy sauce
2 tablespoons raw sesame seeds
2 tablespoons black sesame seeds

2 lbs of fish fillets, skin removed


fish in marinade

Mix all the ingredients for the marinade together. In a lasagna dish, coat the fish fillets with the marinade. Refrigerate until ready to use. The fish can be grilled or baked (place an oiled cookie-sheet) until inner temperature reaches 145F. If I bake it, I end the last few minutes by broiling it so it can caramelize on top.

Artsy-Foodie's Tip:
Leftovers make a great sandwich. Spread hummus on two slices of bread, add a lettuce leaf, a few tomato slices and the left-over fish and enjoy!


More delicious marinated dishes:
Cilantro Thai Grilled Chicken
Pomegranate Marinated Tofu

Tuesday, October 21, 2008

Black Forest Bread from Living Without Magazine

black forest bread sliced

This is not my recipe but I'm compelled to share it with you. I came across this bread in a wonderful magazine called Living Without. This periodical is well-written and informative: an all-around great resource for people with food allergies or sensitivities as well as just-plain-adventurous cooks. I sampled a half-dozen recipes from the last issue and was pleased with every single one of them.

black forest slice cream cheese

This rich bread is a real delight right out of the oven. My kids enjoyed a slice with some chocolate spread, thereby reaffirming their philosophy that you can never have too much chocolate. The aroma which overtakes your home is reason enough to make a loaf, but the texture and amazing flavor you'll savor is the true reason why you should go through the trouble. Frankly, gluten-free or not, anyone would enjoy a warm slice. It has the feel and richness of a chocolate brioche. My children have made it clear that they want to see this bread make repeat appearances in our kitchen.

black forest bread out of pan

Black Forest Bread adapted from Living Without Magazine (makes 1 loaf)
3/4 cup chickpea flour
3/4 cup cornstarch
1/2 cup cup brown rice flour
1/2 cup tapioca flour
1/2 cup coconut flour
1 tablespoon xantham gum
1/2 cup unsweetened cocoa powder
3/4 teaspoon salt
1/4 cup granulated sugar
2 tablespoons dry yeast
3 tablespoons melted butter
1 cup water
1 teaspoon apple cider vinegar
3 large eggs, beaten
1 teaspoon GF almond extract


Oil a loaf pan

In a mixer combine all the dry ingredients and mix on low speed then add the melted butter. Mix some more while you prepare the wet ingredients. In a bowl combine the water, vinegar, beaten eggs, and almond extract. While the mixer is on low speed, add the wet ingredients into the dry ones. Then increase the speed and let it run for about 5 minutes. Transfer the batter to the oiled loaf-pan. Cover with a clean towel and let it rise for 30 minutes. During that time preheat the oven to 375F.

Bake the bread in the center of the oven for 40 minutes or until a nice crust has formed on top and bottom sounds hollow when tapped.

black forest slice served


Artsy-Foodie's Tip: This bread is perfect for french toast. Plan ahead, slice it thick and freeze some slices for your weekend brunch.


More Delicious bread recipes...
Gluten Free Oatmeal Bread
Almost Challah

Monday, October 20, 2008

Cardamom Dark Chocolate Cookies

cardamom cookies chocolate plate

It's hard to believe that cardamom is from the ginger and turmeric family. In addition to its incredible ability to take over the flavor of a dish, it has, in my opinion, very little in common with the flavor of its cousins. It is widely used in the cuisine of India, where it grows wild and is now cultivated. Indian cooks flavor savory dishes and desserts with this fragrant seed. The Arab world adds it to coffee to create an aromatic warm beverage. The Scandinavians bake it into delicious loaves of bread.

Its flavor reminds me of Persian dried limes: citrusey and earthy at the same time. I have been pairing it with dark chocolate for awhile. The cardamom complements the rich taste of dark cocoa perfectly.

cardamom cookies with dark chocolate

Cardamom Dark Chocolate Cookies (makes 12)
If you are not concerned about gluten or wheat, you can substitute the 1/2 cup of millet flour, 1/2 cup of tapioca starch for 1 cup of all-purpose flour instead and omit 1/4 teaspoon of xantham gum. However, use the almond meal according to the recipe, it adds a nice texture to the cookies.

4 tablespoons unsalted butter, softened
2 tablespoons cream cheese, softened
2 tablespoons turbinado sugar, or granulated
1/2 cup of powdered sugar
1 egg
1 teaspoon ground cardamom
1/2 cup almond meal
1/2 cup millet flour
1/2 cup tapioca starch
1/4 teaspoon xantham gum
1/8 teaspoon salt

Dark chocolate chunks or chips


Preheat oven 375F
Oil a cookie sheet

In a mixer, cream the butter, cream cheese and sugars together until well combined and fluffy, scraping the sides if necessary (about 3 minutes). Add the egg and cardamom. Mix some more. Then add the almond meal, millet flour, tapioca starch, xantham gum and salt. Mix well.

Put a well rounded tablespoon of the mixture onto the cookie sheet to form each cookie. With the help of spatula, flatten slightly and decorate the top of each cookie with the dark chocolate chunks. Bake for 15-20 minutes or until bottom of cookies are slightly golden.

cardamom cookies dark chocolate  bite


Hungry for more scrumptious cookies?
Cranberry Pistachio Wedding Cookies
Lebanese Walnut Cookies

Friday, October 17, 2008

Adventures in Indian Cooking

ural dal with yogurt sauce

I decided to make some lentils fritters after seeing Bee's enticing post last week. I commented on her blog and she was kind enough to email me and to tell me about an alternate way to eat Urad Dal Croquettes.

ural dal in pan

I purchased a special pan for the sole purpose of making the delectable fritters I have seen in various posts on Jugalbundi. I am a minimalist in the kitchen, moving will do that to you, but I am hoping to put that pan to good use.

I took her concept and messed with it a bit. I just can't help myself. The lentil batter screamed out for mango chutney and more spices.

Another confession-- I bought the pan two months ago and today was the first day I actually used it. I had visions of the most perfect little croquettes emerging from the egg shaped cavities of my new iron pan. Reality hits you hard when you are delusional. Bee must know something I don't because my little morsels of joy were not as pretty as hers but they were delicious.

urad dal croquettes in bowl

The double batch I made came in handy when halfway through, I experienced a case of fryer's guilt and wondered what would happen if I baked the rest instead. I set the oven on 500F to simulate the high heat you get from frying and opted for my muffin pan to shape the lentil batter into patties. It only took ten minutes to bake them and I have to say that the results were excellent.

urad dal patties open view

The fried croquettes were crisp on the outside and fluffy inside. The baked ones were more pancake like but still moist and flavorful. Either cooking method yields superb results, in my opinion, and goes so well with the yogurt sauce.

urad dal tower

Urad Dal Croquettes with Yogurt Sauce (serves 4)
Urad dal is white but it's really black lentils without their outer skins (available in any Indian food store).

1 cup of urad dal, soaked for 4 hours
2 tablespoons mango chutney
1/2 tsp ground ginger
1/2 tsp ground cumin
1/2 tsp salt
1/4 tsp baking powder

1/4 tsp cumin seeds
2 tablespoons finely chopped cilantro

Oil for frying
Yogurt Sauce (see below)

Drain the dal but reserve about 1/4 cup of the soaking liquid. Put all the ingredients and the soaking liquid, except for the cumin seeds and cilantro, in a blender. Process until smooth then add the cumin seeds and cilantro and mix.

Fry in a pan by putting a well-rounded tablespoon of the batter for each croquette in the hot oil. Flip to brown on all sides.

Or to bake them instead:

urad dal patties baked

Preheat the oven to 500F.
Oil a muffin pan. Fill each muffin cup about 1/3 full. Bake for about 10 minutes or until set and slightly puffy. The edges will look golden brown. Do several batches if necessary.

urad dal yogurt sauce

Yogurt Sauce

1 cup plain yogurt
1/4 cup chopped cilantro
1 tablespoon lime juice
1 small garlic clove, minced
1/4 tsp salt


Mix all the ingredients in a bowl and serve with croquettes.

Artsy-Foodie's Tip:
The fried croquettes are wonderful fresh but don't make good leftovers. As time goes by, the oiliness comes out. If you want to make this recipe ahead of time consider baking the batter into patties instead of frying them. They'll keep longer that way.


Here are other Indian recipes for your enjoyment:
Pea Vine, Zucchini Patties with Yogurt Sauce
Halibut Curry

Thursday, October 16, 2008

The Delightful Strangeness of Blueberry Pudding Cake

pudding cake close-up

You want cake. You want pudding. You want pudding cake. It's bit of strange concept, but why not? Most people like something creamy to add moisture to a slice of cake and this recipe comes with it built-in.

The idea for this dessert came from gluten-free cookbook author Rebecca Reilly . I started out with her recipe and changed it quite a bit.

pudding cake served

I switched some of the GF flour to almond meal, which adds richness and texture. Once that was done, the oil could be omitted since the almonds provided plenty. I also substituted soymilk instead of regular milk and egg whites instead of egg replacer powder. I have found that most recipes can afford less sugar without compromising the treat factor. Agave nectar, a sweetener derived from the agave cactus, is my first choice when I create a recipe. I replaced a lot of the sugar in the original recipe with a reduced amount of agave nectar. The result was a nice and light fruity-dessert which the whole family enjoyed.

pudding cake bite

Blueberry Pudding Cake (serves 6)
If you are not on a wheat-free or gluten-free diet, I suggest omitting the xantham gum and replacing the GF flour mix with all-purpose wheat instead. The cold leftovers go great with coffee. Refrigerate any remaining cake overnight and enjoy them for breakfast the next day.


3/4 cup almond meal
3/4 cup GF all purpose flour mix (such as Bob's Red Mill)
1/4 teaspoon xantham gum
2 teaspoon GF baking powder
1/4 teaspoon salt

2/3 cup soymilk, or regular lowfat
1/3 cup agave nectar
1/3 cup egg whites

2 cups frozen blueberries

1 tablespoon arrowroot
1/4 cup turbinado sugar, or granulated

1 cup boiling water


Preheat oven to 350F.
Oil a circular deep ceramic pie or gratin dish.

In a mixer combine the flour, xantham, baking powder and salt. Mix on low speed until combined.
Mix the soymilk, nectar, egg whites in a smaller bowl. Add to the dry ingredients in the mixer and mix well to form the batter.

Place the frozen blueberries on the bottom of the pre-oiled dish. Place the ceramic dish on top of a cookie sheet to catch drips during baking. Pour the batter on top of the berries. Mix the turbinado sugar with the arrowroot. Sprinkle the sugar mixture on top of the batter. Pour the boiling water carefully on top of the whole thing and bake for 55-60 minutes or until the top has formed a golden crust and is partially set. Let cool before serving.

Artsy-Foodie's Tips:
-This cake tastes even better the next day, which makes it a great make a day ahead dessert.
-If you don't have Arrowroot in your pantry use some cornstarch instead.
-For an added special touch, make a batch of fresh whipped cream with a little agave nectar and a teaspoon of hazelnut or almond extract.

pudding cake whipped-cream


More lovely blueberry desserts for you to enjoy...
Easy Blueberry Pudding
Mango Blueberry Kanten
Blueberry and Plum Clafoutis

Tuesday, October 14, 2008

What To Do with Spaghetti Squash?

spaghetti squash

Lets talk about a weird vegetable: Spaghetti Squash. This impostor for spaghetti is from the winter squash family. It originated in North or Central America. This vegetable is often used as a replacement for pasta in dishes with an Italian flare. I am one of those cooks who refuses to look at things for what they are. I, therefore, cannot get myself to pour a jar of tomato sauce on cooked spaghetti squash. The rebel in me screams out for a less obvious use, something a little more unique like Spaghetti Squash and Quinoa Bake.

spaghetti squash quinoa bake

This dish is based on a Persian Kuku, an egg dish similar to a thick frittata. It's a perfect accompaniment to soup for a light dinner.

spaghetti squash bake fork

It requires some advance preparation since both the quinoa and spaghetti squash need to be cooked ahead of time. Cook the squash and quinoa earlier in the day or even better the day before.

spaghetti squash bake close-up

Spaghetti Squash and Quinoa Bake (serves 8)


4 cups of cooked spaghetti squash (1 large)
16oz lowfat cottage cheese
1/2 tablespoon olive oil
2 tablespoon mild pepper, chopped fine
1/2 cup onion, finely chopped
1 teaspoon salt
2 cups cooked quinoa
1/2 cup egg whites
4 large eggs, beaten
1 cup shredded cheese (mexican blend)
2 teaspoon dry dill

Preheat oven 375F
Pre-oil a deep ceramic baking dish (large lasagna dish).

Heat the oil in a pan over medium flame. Add the pepper and onion. Saute, stirring often, until caramelized (about 10-15 minutes).

Mix all the ingredients in a large bowl. Transfer to the pre-oiled dish and bake for 1 hour 20 minutes or until the bake is set and the top is golden. If you would like to reduce the cooking time to an hour, use two deep pie dishes instead of the large lasagna dish.

spaghetti squash quinoa on fork

Artsy-Foodie's Tip:
Before cooking quinoa, make sure you rinse the grain really well in a colander. Quinoa has a soapy coating called Saponin which tastes quite bitter. In the U.S., most of the quinoa sold has already been pre-soaked for convenience, however a good rinse is extra insurance.
Related Posts with Thumbnails