Saturday, May 1, 2010

Crispy Basil Leaves & Marinade for Tofu or Chicken

Basil crispy

My CSA box came with a glimpse of summer a few weeks ago: a small bag of beautiful basil leaves.  It was a bit unexpected, and I was at a loss for a clever way to prepare the beautiful leaves.  Pesto seemed too obvious and my husband vetoed that idea.  He suggested a Thai basil dish--something I had never made at home before.  I started to do some research and decided to crisp half the leaves in an oven instead of frying them.  I decided to use the remaining basil for a lovely Asian style marinade.


The recipe below was excellent with tofu but would work as well on bite size pieces of chicken.  If you are gluten free or wheat free, please be aware that soy sauce is a common source of hidden wheat. 

By the way if you are looking for an excellent CSA in the Seattle area: Jubilee Farm is a great one to support.   I am as hooked on the fresh produce they send me as I am on farmer Erick's weekly newsletter which is included in every box.  They've started their own blog as well: The Growing Revolution .

Don't miss a single recipe--subscribe to Artsy-Foodie using the tool at the top right of the screen and receive Artsy-Foodie in a convenient email newsletter.

basil-crispy tofu with rice

Crispy Basil Leaves
Wait until serving time to add the crispy leaves to your dish to retain the contrast in texture between the leaves in the marinade and the ones you've crisped.
 
  • Preheat oven to 350F.
  • Oil two cookie sheets.
  • Coat basil leaves with vegetable oil of your choice and lay flat onto the cookie sheets.
  • Sprinkle sea salt on top.
  • Bake for 10-13 minutes or until crisp.  Remove and let cool.
  • Reserve to top your cooked marinated chicken or tofu.

Basil Asian Marinade for Tofu or Chicken
This recipe will make enough marinade for 1 lb of firm tofu, or bite size pieces of chicken tenders.

1 tbsp rice vinegar
2 tbsp GF soy sauce 
1 tbsp toasted sesame oil
1 tbsp chili sauce
1 cup basil leaves, cut into thin strips
1 tbsp garlic, minced
1 tsp of brown sugar, or maple syrup

  • Mix all the ingredients in a large dish. 
  • Add your protein of choice and let sit in the refrigerator for at least 2 hours.  You can leave it marinating all day or overnight for convenience.
 
  Print this recipe


Tuesday, April 20, 2010

So Many Fishes In the Sea

I've been very busy at school, a condition that's likely to persist for awhile.  I'll be posting less frequently until things quiet down a bit.

 ___________________________

If you're like me, you may find the vast amount of food and nutrition information out there to be a mixed blessing.  You can learn about almost anything, but there's a lot to wade through and what you find is often inconsistent. 

Fish is a perfect example.  We're told that we should eat lots of it because it's such a great source of important omega-3 fatty acids.  Other sources tell us that we should limit our consumption because of mercury contamination, unsustainable fishing practices, and already-depleted fisheries.   What's a girl to do?


In this particular case, the good folks at the Monterey Bay Aquarium do the homework for you.  Their website provides a geographically targeted guide to which species are okay to eat and which should be avoided.  You just click on your area on the map and out pops a printable wallet size guide to what you can safely buy.  Simple, reliable and easy!
  
Seafood Watch


Here are some delicious fish recipes for you to try:


Don't miss a single post--subscribe to Artsy-Foodie using the tool at the top right of the screen and receive Artsy-Foodie in a convenient email newsletter.

Wednesday, April 7, 2010

Oh My...Flourless Brownies

Flourless brownies crumbs

These completely flourless brownies are what memorable dessert dreams are made of:  every bite is moist, rich, intense, and completely delicious.  You'll not only take little nibbles to make the pleasure last just a little bit longer but you'll most likely commit to making another batch before you reach the end of the first one.

I found this recipe idea over at Elana's Pantry.  She always inspires me with her clever use of gluten free and wholesome ingredients. I altered her original recipe just a bit:  maple syrup and a little evaporated cane juice instead of agave nectar, a little extra water, a little easier on the dark chocolate chips.  The result was a batch of very addictive and decadent brownies, blissfully free of (cow) butter or flour.


Don't miss a single recipe--subscribe to Artsy-Foodie using the tool at the top right of the screen and receive Artsy-Foodie in a convenient email newsletter.

flourless brownies

Flourless Brownies
(makes a 9 x 13 dish)


16 oz almond butter, smooth and roasted
2 eggs, beaten
1/2 cup pure maple syrup
1/4 cup evaporated cane juice
3/4 cup room temperature water
1 tbsp vanilla extract
1/2 cup cocoa powder, unsweetened
1/2 tsp salt
1 tsp baking soda
3/4 cup dark chocolate chips
1/4 cup walnut pieces, optional

  
  • Preheat oven to 350F.
    Place the almond butter, eggs, maple syrup in your mixer and blend until smooth.
  • Add the remaining ingredients (except for the walnut pieces)
  • Mix again to combine .
  • Oil a 9 x 13 ovenproof dish.
  • Pour the batter into it and sprinkle with walnut pieces.
  • Bake at 350F for 20-30 minutes (20 minutes will yield some seriously gooey brownies, so leave them for 30 minutes instead if you like yours more dry).


Thursday, April 1, 2010

Food for Thoughts

I thought I'd share this short trailer for Joel Salatin's new documentary: Fresh the Movie.  Joel and his unique sustainable farming practices were featured in Michael Pollan's book The Omnivore's Dilemma and Robert Kenner's movie Food, Inc.  Works like these do the important job of educating us all about where our food comes from and why we should care.  


Today I discovered evidence that the message is having an impact:  a new Bill the Butcher store opened up in my Greater Seattle neighborhood.  They offer a wide range of meat and poultry (and other gourmet items), all of which were produced locally using sustainable farming practices.  The local store is managed by Scott, a classically-trained chef who eagerly plies you with delicious samples while telling you about where they came from.  We left with some grass-fed beef that became our dinner--it was intensely flavorful, a cut above anything we could have bought at any of our usual places.  Bill's is going to be our butcher from now on.


Don't miss a single post--subscribe to Artsy-Foodie using the tool at the top right of the screen and receive Artsy-Foodie in a convenient email newsletter.

Thursday, March 25, 2010

Gratin Dauphinois--Scalloped Potatoes French Style

gratin dauphinois 4
 I've decided to give you a break from all the chocolate recipes and go back to something savory.  For this recipe, I reached back to childhood memories of my mother's Gratin Dauphinois: a casserole made from layers of potatoes, crême fraiche (french sour cream) and cheese. 

I am not sure how this one compares to my mom's--memories have a way of making something special even more so-- but it was very tasty and a thumbs-up from my little diners.  It's a real treat paired up with grilled fish or with a colorful salad.

Gratin Dauphinois 1

Don't miss a single recipe--subscribe to Artsy-Foodie using the tool at the top right of the screen and receive Artsy-Foodie in a convenient email newsletter.

Gratin dauphinois 2


Gratin Dauphinois--Scalloped Potatoes
I like to use organic potatoes so I don't have to peel them. The nutritious benefits of potatoes are concentrated in the skin.
(serves 6-8)

8 medium size organic rose potatoes, washed, dried and sliced thin
Sea salt, to taste
Garlic Powder
2 cups Parmesan or Swiss cheese, shredded
1 cup creme fraiche
1 1/2 cups lowfat or whole milk
+ 1/2 cup more of milk
1 large egg, beaten


  1. Oil a 9 x 13" dish.
  2. Preheat oven to 350F
  3. Place one layer of the sliced potatoes on the bottom of oiled dish.
  4. Sprinkle a pinch of salt over the layer and then a pinch of garlic powder (1/4 tsp).
  5. Spread 1/4 cup of the cheese over the potatoes.
  6. Repeat steps 3-5 until all the potatoes are used or until you have 1/2" of space left in your dish. You should have 4-5 layers.
  7. Mix 1 1/2 cup of mix with the crême fraiche and pour over the potatoes.
  8. Sprinkle with the leftover cheese.
  9. Bake for 1 hour
  10. In a bowl mix in the additional milk with the beaten egg, add a pinch of salt and carefully pour over the baked dish.
  11. Return to the oven for another 10 minutes.  A golden crust should have formed on top.
  12. Remove from the stove and let cool at least 10 minutes before serving.

Print this Recipe

Friday, March 19, 2010

Chocolate Hazelnut Spread

chocolate hazelnut spread2

I grew up on Nutella and pain brioché (a rich and buttery bread popular in France). My family could empty a jar at light-speed, no problem. Once looked at as a gourmet product, it is now everywhere: on the shelves of Costco and at your local grocery store.  These days I prefer to make my own concoction.  I favor flavor over sugar and I like my own palette of ingredients much better than what you get in the store-bought kind.

chocolate hazelnut spread apple

My kids loved this creation.  My husband agreed that it was really good but he would have liked it better sweeter--he was outnumbered.  The good thing about making it at home is that you can adjust the sweetness according to your taste.  It always turns out just right!


I am about to enter a week of finals and I know that this spread will get me through the long hours of studying--just like Nutella used to do all those years ago.  Only this spread is healthier!


Don't miss a single recipe--subscribe to Artsy-Foodie using the tool at the top right of the screen and receive Artsy-Foodie in a convenient email newsletter.

chocolate hazelnut spread1

Chocolate Hazelnut Spread                       
I used both a food processor and a blender for this recipe.My blender could not handle the hazelnuts at the beginning and then I switched to the blender to make the spread smoother. If you don't mind a chunkier spread you can make it entirely in the food processor.  Or if your blender is powerful enough to handle it, you can make it entirely in the blender.

1 1/2 cups hazelnuts
2 tbsp roasted hazelnut oil
2 tbsp coconut oil, melted
3 tbsp cocoa powdered, unsweetened or more to taste
2 1/2 tbsp evaporated cane juice (sugar)
1 tsp GF vanilla extract
1 tsp agave nectar or honey (optional)

Place all the ingredients in a food processor and process for five minutes, scraping the sides as needed. Transfer to a blender to obtain a smoother paste.  Taste and adjust the sweetness to your liking.  Transfer to a jar with a lid and store in the refrigerator.


Print this recipe


Monday, March 15, 2010

Amazing Teff Chocolate Chip Cookies

Teff cookies in jar

These unusual cookies came about out of necessity:  we were in the middle of our weekly family night pizza dinner when I realized that we had forgotten about dessert.  Within fifteen minutes, and with the help of two of my children,  a big batch of scrumptious cookies was baking in our oven.  The whole house smelled wonderful by the time the timer beeped.

Teff tastes nutty and earthy.  It goes really well with almond or peanut butter and (as I found out) dark chocolate as well.  These vegan cookies are quite addictive but full of wholesome ingredients.  They are sweetened with maple syrup, which adds a buttery sweetness that does not overwhelm.  The dark chocolate chips are less sweet than regular semi-sweet chocolate chips. I prefer it that way, it allows the flavors to really come through.  My teenage son thought they were even better the next day.

My next post will feature a sinful hazelnut-chocolate spread.  Nutella doesn't stand a chance...

Don't miss a single recipe--subscribe to Artsy-Foodie using the tool at the top right of the screen and receive Artsy-Foodie in a convenient email newsletter.

Teff cookies


                                                                                        Print this recipe

Amazing Teff Chocolate Chip Cookies
 
1 cup roasted almond butter, unsalted
1 tsp vanilla extract
4 oz unsweetened applesauce
1/2 cup pure maple syrup

1 1/2 cups teff flour

1/8 tsp salt
dark chocolate chips


  • Preheat oven to 350F.
  • Oil two cookie sheets.
  • In a food processor, place the almond butter, vanilla, apple sauce and maple syrup.  Mix to cream the ingredients together (2 minutes scraping the sides as needed)
  • Add the Teff flour and salt to the food processor and pulse until combined.
  • Scoop batter to make balls 1 1/4" in diameter and then arrange in rows--leave an 1" of space around each one.
  • Flatten with the back of a fork each ball of batter.
  • Arrange dark chocolate chips evenly on top of each cookie.
  • Bake for 13 minutes in the center of the oven.  The bottoms should be slightly golden but the tops will still be slightly soft.
  • Let cool on a rack.
  • Keep in an airtight container in your pantry or on the counter for a few days.


Tuesday, March 9, 2010

Creamy Chocolate Goodness

chocolate cream bar

I can do without a treat on most days but every once in a while a creamy, rich, delectable dessert calls to me--and it usually involves chocolate. 

chocolate cream trio


Silken tofu is the perfect conduit for the rich taste of dark chocolate.  It has other traits to recommend it as well: it is packed in convenient little cartons which you can keep on hand in your pantry; it is relatively healthy if you tolerate soy; and with the help of a food processor, it yields a lovely dessert in minutes.

If you're in the mood for more chocolate treats, be sure to check back for my next posts...

Don't miss a single recipe--subscribe to Artsy-Foodie using the tool at the top right of the screen and receive Artsy-Foodie in a convenient email newsletter. 

Chocolate cream top jar

Dark Chocolate Cream 
(serves 6)
If you use agave nectar this treat is completely vegan. The coconut oil is optional but it gives the cream a wonderful extra creaminess and richness.  You might want to serve this dessert with some homemade biscotti or other cookies of your choice for dipping.

2 12.3 oz packages of firm silken tofu
1 tsp GF vanilla extract
1/4 cup + 2 tbsp unsweetened pure cocoa powder
2 tbsp evaporated cane juice
2-4 tbsp honey or agave nectar (according to your taste) 
2 tbsp virgin coconut oil, melted (optional)

Place all the ingredients in a food processor fitted with a blade. Process,  scraping the sides occasionally.  Stop blending when the mixture is smooth and creamyTransfer to a serving dish or individual dishes and store in the refrigerator for at least two hours before serving.

Printable Recipe

Tuesday, March 2, 2010

Crockpot, or not, Albóndigas Soup

Albondigas soup1

Winter started out in the Fall this year with pipe-bursting temperatures.  Although mother nature has been kinder to us with the new year in the Northwest, I still crave steaming pots of bubbling soup when I come home from a full day of classes.  I have become a bit of an expert at whipping out my crockpot at 5 o'clock in the morning.  I chop my ingredients with a knife in one hand and a hot cup of coffee in another.  It takes some planning ahead but it is worth the effort.  This allows me to spend time relaxing and catching up with my family as soon as I arrive home in the evenings without having to worry about dinner preparations.


Albóndigas soup is one of my husband's favorites.  I use to make it regularly in the early years of our marriage.  It's been at least fifteen years since the last batch--way overdue. This Mexican meatball soup bursts with warm spices and colorful vegetables.  Don't let the long list of ingredients chase you away from making this delicious Latin dish--it's not hard to make and a lot of the prep-work can be done ahead of time.  I have posted two methods for you to choose from: simmer it slowly in the crockpot for 8 hours or for 30 minutes on the stove-top if you are short on time.  The choice is yours but either way it's sure to please everyone at your table. 

Don't miss a single recipe--subscribe to Artsy-Foodie using the tool at the top right of the screen and receive Artsy-Foodie in a convenient email newsletter.

Albondigas soup2

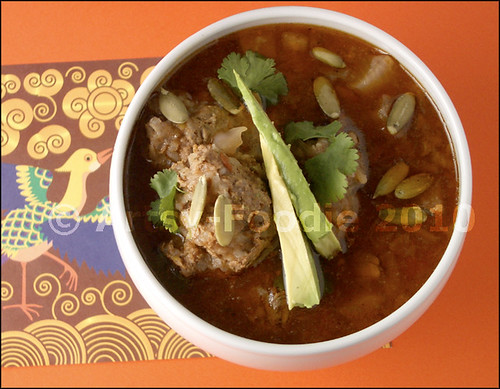
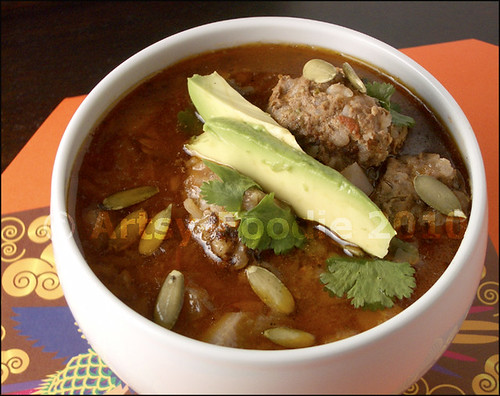
Crockpot or not Albóndigas Soup 
(serves 6)
Here's how to save time:  Chop and prepare all the vegetables the night before and refrigerate until ready to use.  I like to use my food processor and pulse a few times to chop each one finely.  

1 stick cinnamon, cut in three pieces
1 1/2 tsp cumin seeds
1/4 tsp ground cloves
2 tsp coriander seeds
1 tbsp olive oil
1 1/2 cups yellow onion, finely chopped (reserve 1/4 cup for the meatballs)
3 cups red cabbage, finely chopped
4 stalks celery, finely chopped
1 yellow bell pepper, finely chopped 
2 turnips, peeled and diced
4 rose skin potatoes, diced (makes 2 cups)
1 cup delicata or butternut squash, diced
1 lb grass-fed lean ground beef
1 large egg, beaten
1/2 cup basmati rice, uncooked
1/4 tsp smoked paprika
1 tsp garlic powder
1 tsp oregano
1 bay leaf
1/2 tsp sea salt or more to taste
1 tsp chipotle pepper in adobo sauce, chopped (optional)
32 oz  chicken or vegetable broth
15 oz fire roasted tomatoes, chopped + juice

Optional toppings for Serving: 
Chopped cilantro
Pepitas
Diced avocado
Crushed tortilla chips

Crockpot Method:                   Printable crockpot recipe

Cooking time may vary depending on the make and model of your slow-cooker.  You may need to adjust the cooking time according to manufacturer's instructions.                                     

Place a large pot under medium heat, and saute the cinnamon, cumin, ground cloves, and coriander seeds for a minute or two until fragrant.  Place in a spice grinder and pulse until finely ground.  Set aside for now.


Using the same pot, heat 1/2 tbsp of olive oil.  Add the onions mixing occasionally until they start to soften.  Add the cabbage, celery, bell pepper, 1/4 tsp sea salt and continue sauteing for another five minutes.  Transfer to the crockpot.  Add the potatoes, turnips, and squash and mix together.


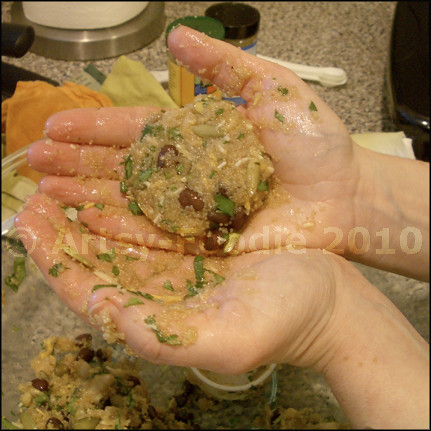
In a large bowl, combine the meat, egg, rice, 1/4 cup of chopped onion previously set aside, paprika, garlic powder, oregano, 1/4 tsp sea salt, and two teaspoon of the spice mixture.  Mix until thoroughly combined.  Form meat mixture into golfball sized meatballs and set aside.


Add the remaining spice mixture along with the chipotle (if using), the broth, the tomatoes as well as the bay leaf into the crockpot  and mix well.


Heat remaining 1/2 tbsp of olive oil in the pot under medium heat.  Brown the meatballs in batches until each one is golden brown on all sides.  Transfer into the crockpot.  Gently mix into the broth-vegetable mixture.  Set your crockpot on low temperature and cook for at least 8 hours.  If you have a timer, you can set it so that it stops cooking after 8 hours but still keeps it hot for your dinner.


Serve with bowls of various fun toppings at the center of the table and enjoy!


Stove-top Method:               Printable Stove-top recipe

Place a large pot under medium heat, and saute the cinnamon, cumin, ground cloves, and coriander seeds for a minute or two until fragrant.  Place in a spice grinder and pulse until finely ground.  Set aside for now.


Using the same pot, heat 1/2 tbsp of olive oil.  Add the onions mixing occasionally until they start to soften.  Add the cabbage, celery, bell pepper, 1/4 tsp sea salt and continue sauteing for another five minutes, stirring often.  Transfer to a large bowl.  Then add to it the potatoes, turnips, and squash and mix together.


In another large bowl, combine the meat, egg, rice, 1/4 cup of chopped onion previously set aside, paprika, garlic powder, oregano, 1/4 tsp sea salt, and two teaspoon of the spice mixture.  Mix until thoroughly combined.  Form meat mixture into golfball sized meatballs.


Heat remaining 1/2 tbsp of olive oil in the pot under medium heat.  Brown the meatballs in batches until each one is golden brown on all sides.  Return all the meatballs to the pot.  Add broth, all the vegetables, tomatoes, bay leaf, remaining spice mixture, and chipotle (if using).  Gently mix together and bring to a boil.  Cover and lower the heat to a simmer.  Continue simmering for 30 minutes.  

Serve with bowls of various fun toppings at the center of the table and enjoy!


Saturday, February 20, 2010

Indian Flat Bread

Indian flatbread in front of mirror

It's been a busy week.  Cooking and baking is a way for me to relax and get centered when my schedule gets too hectic.  It slows me down and grounds me to what's truly important: my family.  I know that if I cook Indian food, it will put a smile on their faces.   Over the years, we have savored many dishes inspired by this flavorful cuisine. 

Usha of Veg Inspirations has a recipe for an Indian flat-bread called Besan Roti on her wonderful blog.    The breads are especially delicious and pair up perfectly with the many vegetable stews that Indian cooks make. Flatbread, especially, can be adapted successfully for the gluten free kitchen.


Indian Flatbread with Goat Cheese

I had no problem altering Usha's recipe to make it gluten free.  I suspect that her final product was more malleable than mine because it contained gluten.  My Indian Chickpea Flatbread was more like a soft cracker bread.  I also changed the spices a little because I love cumin seeds so much.  The result was a wonderfully flavored flat bread, easy to make and hard to resist.  It goes really well with a goat cream cheese, or tomato salad and of course your favorite dhal (Indian lentil stew).  This was a definite winner with all my kids.

Don't miss a single recipe--subscribe to Artsy-Foodie using the tool at the top right of the screen and receive Artsy-Foodie in a convenient email newsletter.

Indian Flatbread Fan

Indian Chickpea Flatbread
(serves 6)

1/2 cup tapioca Starch
1/2 cup millet flour
1 cup chickpea flour
1/4 tsp xantham gum
1/4 tsp ajwain seeds (optional)
1/2 tsp cumin seeds
1/2 tsp sea salt

1 tsp vegetable oil

1/2 cup cold water

1/4 cup chopped cilantro


  • Mix all the dry ingredients in a bowl
  • Make a well in the center of the flour mixture and add the water and oil.  Mix with a fork.
  • Add the chopped cilantro
  • Incorporate the flour and water/oil together.
  • The dough should be smooth but moist.  Cover the bowl with a towel and let rest for 30 minutes. 
  • Form dough into golf size balls.
  • Put a pan on medium heat, then coat with a thin layer of oil.
  • Flatten each ball into a thin disk and fry on each side until slightly golden (about three minutes) 
Printable Recipe

Friday, February 12, 2010

Sweets for Your Sweetie

pie mocha heart

Valentines Day is as good an occasion as any to share some memorable food with the people you love.  I've put together a list of spectacular desserts to celebrate with your valentine:


caramel choco pear spoon


Chocolate Hazelnut Stuffed Figs


lemon meringue cupcake platter


Wishing you and your sweetie a wonderful Valentines Day!

Don't miss a single recipe--subscribe to Artsy-Foodie using the tool at the top right of the screen and receive Artsy-Foodie in a convenient email newsletter.

Monday, February 8, 2010

Apple Cranberry Tart with Super Easy Crust

Apple cranberry tart

People who are too intimidated to make pie will tell you that their Achilles' heel is the crust.  I confess that I too have uttered my fair share of French words in the process of making pies in the past--but no more.

Apple tart sliced


This recipe will make a pro out of you.  It requires very little in terms of effort: no rolling, no chilling.  All you need to make a melt-in-your-mouth pie crust is a strong wrist or a food processor and tart pan with a removable bottom and voila: perfection every time!


I made this apple tart shiny and appetizing by glazing it with apricot jam.  It's a simple baker's trick that can turn an apple tart from nice enough to stunning.  The cranberries add a visual contrast but feel free to omit them if you don't have any on hand.

Don't miss a single recipe--subscribe to Artsy-Foodie using the tool at the top right of the screen and receive Artsy-Foodie in a convenient email newsletter.

apple cranberry tart top view

Apple Cranberry Tart with Easy Crust (serves 6-8)
This tart is gluten free but since it is loosely based on a crust I found in an old issue of Bon Appetit Magazine, I am sure it would turn out delicious with regular all purpose flour as well--just make sure that no one at your table is sensitive to gluten or wheat.

For the Crust:
1/4 cup coconut oil or room-temperature butter (unsalted)
1/4 cup raw sugar
small pinch of salt
3 large eggs beaten
1 tsp vanilla extract
1/4 cup coconut flour
1/4 cup tapioca flour
1/2 cup brown rice flour

For the Filling:
2-3 apples, peeled and quartered and then thinly sliced
1/4 cup of frozen cranberries
1/3 cup apricot jam

  • Preheat oven to 375F and place a cookie sheet on the bottom rack.
  • Oil a 9" diameter removable bottom tart pan.
  • In the food processor mix together the coconut oil (or butter), the sugar, and salt, scraping the sides as needed, until the mixture is creamy and uniform.
  • Add the eggs, vanilla and process some more until well combined.
  • Add the flours and pulse until just combined.
  • Carefully remove the blade from the machine and transfer the batter to the middle of the prepared pan.
  • With your hand slightly wet, pat the batter down to form an even crust.
  • Arrange the slices in a circular pattern and sprinkle the cranberries on top.
  • Heat the apricot jam slightly until it becomes more liquid and transfer to a mug.  Using a pastry brush, paint the jam generously all over the apples and cranberries and reserve the rest for later.
  • Bake the pie for 45 minutes.
  • Remove from the oven. Warm the remaining jam again and apply a generous coating all over the fruits.  Let cool completely on a rack.
Printable Recipe
    Apple tart with cranberries slice
    Only one slice left!

    Friday, February 5, 2010

    Almond Muffins with Cocoa Nibs

    almond muffins with cocoa nibs close-up

         I started using cocoa nibs in my baking a little over a year ago.  I especially like the nutty texture and slightly bitter chocolate taste they impart to my muffins.  These little bits of goodness are made of the  roasted cocoa bean that has been separated from its husk but not yet turned into the form we are so familiar with: powder, bars, chips etc.  They add a hint of chocolate taste without the overwhelming sweetness that often accompanies chocolate chips.

         These little muffins are wonderful for an afternoon pick-me-up or breakfast in a hurry.  They have just enough sweetness to make them feel like a treat.  The sugar provides the perfect counterbalance to the slight bitterness of the cocoa nibs.  The best part is they come together in no time!


    Don't miss a single recipe--subscribe to Artsy-Foodie using the tool at the top right of the screen and receive Artsy-Foodie in a convenient email newsletter.

    almond muffins with cocoa nibs

    Almond Muffins with Cocoa Nibs
    (makes 12)

    1 cup almond meal
    1/2 cup millet flour
    1/2 cup brown rice flour
    1 tbsp GF baking powder
    1/3 cup raw sugar
    1/4 tsp xantham gum powder 

    1/2 cup plain yogurt or soy yogurt
    1/2 cup milk, soymilk or almond milk
    2 tbsp walnut oil or vegetable oil
    1/3 cup egg whites
    1/2 tbsp vanilla extract
    1/4 cup cocoa nibs
    1/2 cup walnut pieces (optional) 

    • Oil a 12 cup muffin pan.
    • Preheat oven 375F.
    • Mix the first 6 (dry) ingredients thoroughly in a large bowl.
    • Mix the next five ingredients (yogurt-vanilla extract) in a medium bowl.
    • Stir the resulting two mixtures together until just combined.
    • Add the cocoa nibs and walnuts (if using).
    • Mix a few times to distribute nibs and nut pieces evenly.
    • Divide the batter evenly among the muffin cups.
    • Bake for 20 minutes.  The tops of the muffins will be golden when they're ready.
    • Enjoy fresh out of the oven or let cool on a rack.

    Printable Recipe

    Tuesday, February 2, 2010

    Picadillo with Sauteed Almonds

    Picadillo bowl

    Picadillo is a Cuban dish.  This recipe is probably not very authentic but it makes for one delicious meal.  I have adapted it from a wonderful cookbook called: The 150 Best Slow Cooker Recipes.  My friend Marieke gave me the book as a gift years ago and I have been putting it to good use ever since.


    This is ideal for a family meal or for company.  The leftovers are only enhanced the next day as the flavors mingle together and the ingredients become good friends.  Leftovers are rare when I make Picadillo, though:  it's just too delicious.

    I made it with buffalo meat instead of my usual grass-fed beef.  Although I usually make it in the slow cooker, this time I made a few changes to try it on the stovetop.  It turned out beautifully!

    Don't miss a single recipe--subscribe to Artsy-Foodie using the tool at the top right of the screen and receive Artsy-Foodie in a convenient email newsletter.

    Picadillo plate close-up

    Picadillo with Sauteed Almonds (serves 6)
    Serve this wonderful dish with brown rice and sauteed greens.  I especially love sauteed collard greens with garlic.

    1 tbsp olive oil
    2 lbs ground buffalo  (or lean grass-fed beef)
    2 tbsp of minced garlic
    2 tsp oregano leaves
    1 tsp sea salt
    1/4 tsp ground cinnamon
    1/4 tsp ground cloves
    1 bay leaf
    1 can 6 oz tomato paste + 1 can-worth of hot water
    2 tbsp red wine vinegar
    12 pimiento-stuffed olives, halved
    1/2 cup slivered almonds
    1 tsp olive oil

    • Heat 1 tbsp olive oil in a large pot and brown the meat under medium to high heat.
    • Add the garlic, oregano, salt, cinnamon, cloves, bay leaf, tomato paste and water, red wine vinegar.
    • Mix well, bring to a boil, and reduce the heat to a simmer and cover.
    • Simmer for 20 minutes
    • Add the olives and continue simmering for 10 more minutes.
    • In a small pan, heat the 1 tsp of oil and add the almonds.  Saute until golden and remove from the heat immediately.
    • Sprinkle sauteed almonds on meat mixture and serve immediately.
    Printable Recipe


    Picadillo in plate
    Enjoy!

    Friday, January 29, 2010

    Interviews with Michael Pollan


    If you're like me, you enjoy reading and hearing about relevant health and nutrition issues.  Michael Pollan's books are informative and open your eyes to the many problems in our diet and food supply.  Here are some links to recent interviews about his new book Food Rules.


    Subscribe to Artsy-Foodie using the tool at the top right of the screen and receive Artsy-Foodie in a convenient email newsletter.

    Tuesday, January 26, 2010

    Gluten Free Crunchy Bread

    crusty bread on board

    When was the last time you sunk your teeth into a decent crunchy gluten free bread? 

    crusty bread french toast

    With its crunchy crust and chewy interior, this bread is perfection straight out of the oven.  The leftovers make great french toast the next morning. Did you know that french toast is called "Lost Bread" in France?  That's because it's typically made with old bread, usually baguette slices--ah, such delicious practicality!


    Don't miss a single recipe---subscribe to Artsy-Foodie using the tool at the top right of the screen and receive Artsy-Foodie in a convenient email newsletter.


    crusty bread slices

    Crusty Gluten Free Bread (makes one round loaf)
    This recipe is based on the French Baguette recipe featured in a 2008 issue of Living Without magazine.


    1 cup garbanzo bean flour
    3/4 cup arrowroot starch
    3/4  cup tapioca starch
    1/2 brown rice flour 
    2 tsp xantham gum
    1 tsp sea salt
    1 tbsp granulated sugar
    1 tbsp GF dry yeast

    1 1/2 cups barely warm water
    1 tbsp olive oil


    Oil + Cornmeal for the pan and dish

    • Oil a pyrex or ceramic 2 qt casserole round-dish 
    • In a mixer, combine the first 8 ingredients and mix at low speed for a few minutes while you prepare the wet ingredients (olive oil+water) in a small bowl
    • Keep the mixer on and pour the wet ingredients into the dry. When the batter forms, increase the speed to medium  and mix for 5 minutes.
    • Transfer the batter to the pyrex or ceramic dish and cover with a clean kitchen towel.  Keep in draft-free area and let rise for 1 hour.
    • Preheat oven to 400F.  Place a medium bowl filled with water on the bottom rack of the oven.  Oil a cookie-sheet and dust with cormeal.  
    • Invert the bread onto the prepared cookie-sheet and place in the oven.
    • After 15 minutes, very carefully remove the bowl of water from the oven and dump the content in the sink.
    • Continue baking for another 15 minutes or until the crust is golden and the internal temperature reaches 200F.

    Printable Recipe
       

      Thursday, January 21, 2010

      Colorful Salad with Avocado Cilantro Dressing

      Avocado Salad Dressing Bowl


      Fresh is in order even in the Winter months.  It provides a much needed burst of sunshine.    Making a salad dressing at home takes only minutes can elevate a boring salad to something spectacular.  I used frozen avocado for my creamy dressing.  It works great when this fruit is out of season.

      This salad features a wealth of textures, providing  a little something for everyone: crunchy peppers, nutty pepitas, perfumy cilantro, sweet carrots, smoky roasted corn and refreshing romaine leaves.  The final touch is the creamy lime-cilantro dressing.

      Don't miss a single recipe--subscribe to Artsy-Foodie using the tool at the top right of the screen and receive Artsy-Foodie in a convenient email newsletter.


      avocado salad dressing close up


      Colorful Salad with Creamy Avocado Cilantro Dressing (serves 6)
      Can be prepared ahead of time.  Refrigerate the salad components separately from the dressing and mix together just before serving.

      2 cups of thinly shredded carrots
      2 cups cherry tomatoes, halved
      1/4 cup cilantro leaves
      1 cup roasted corn kernels, thawed
      2 cups red bell pepper, diced
      2 romaine heart salad, torn into bite size pieces
      1/4 cup pepitas

      Dressing:
      1 avocado
      1/4 tbsp olive oil
      2 tbsp fresh lime juice
      1/4 cup cilantro
      1/4 tsp ground cumin
      1/4 tsp garlic powder
      2 tbsp water

      • Place all the salad ingredients in a large bowl
      • In a blender or food processor, blend all the salad dressing ingredients until smooth.
      • Mix the dressing in with the salad just before serving.

      Printable Recipe

      Tuesday, January 19, 2010

      Spinach and Bean Enchilada Casserole

      spinachbeanenchiladaslice

      Some favorites are born out of necessity.  Although I have been making this dish for many years, I still remember how it came about: I needed dinner, I had very little in the fridge and going to the store was not an option.  I combined refried beans with spinach into an enchilada dish that soon became a family favorite.  It's sort of  a Mexican-style lasagna, with tortillas filling in for the pasta.  This casserole is practical for a weekday meal and yet memorable enough for your best company.  I love to make a colorful salad coated with homemade salad dressing.  Later on this week, I'll feature a delightful salad that compliments this enchilada casserole to perfection.

      Don't miss a single recipe--subscribe to Artsy-Foodie using the tool at the top right of the screen and receive Artsy-Foodie in a convenient email newsletter. 


      spinach bean casserole dish

      Spinach and Bean Enchilada Casserole (Serves 6)
      This is a great make-ahead dish, just like lasagna it improves over time.  It will keep in your fridge for a few days.

      16oz Refried Beans
      16oz chopped Spinach, thawed and squeezed dried
      2 cups tomato sauce + 1/2 tsp of ground cumin (mixed well together)
      6 corn tortillas, soaked in hot water to soften
      1 1/2 cup Mexican Cheese Shredded

      • 350F Preheat oven
      • Oil a lasagna dish
      • Spread 1/2 cup of the tomato sauce in the bottom of the dish
      • Place strips of the corn tortillas to cover 
      • Spread the refried beans evenly
      • Add the spinach on top in an even layer
      • Sprinkle 1 cup of the cheese 
      • Add the remaining strips of tortilla on top of the whole thing
      • Finish with the remaining tomato sauce
      • Sprinkle the remaining cheese on top
      • Bake covered for 20 minutes and uncover and bake for another 10 minutes or until bubbly.

       Printable Recipe


        Friday, January 15, 2010

        Gluten Free WholeGrain Baking Fun

        WholegrainbreadwithQuinoaflakes

        A while back, my friend Marie gave me the most delectable jars of homemade Quince Jelly. Any excuse is good for making some homemade bread, so I set out to provide a delivery-device for this lovely jelly.  This earthy bread made good use of the quinoa flakes in my pantry and provided the perfect partner for this rare treat.

        Whole-Grain Bread with Quinoa Flakes 
        (makes 2 small loaves)

         This is a variation on one of my favorite breads. I love exploring new ways of incorporating more wholesome ingredients into my recipes and this one is a winner. It will taste wonderful straight out of the oven with some good salty Irish butter and your favorite jam. Slice and freeze the rest for later use.


        Ingredients:
        1 cup bob's red mill GF mix (or other brand)
        1/2 cup teff flour
        1/2 cup buckwheat flour
        1/2 cup brown rice flour
        1/2 cup quinoa flakes
        1 tsp salt
        2 tsp xantham gum
        1 tbspn GF dry yeast

        2 cups room temperature water
        1 tbsp vinegar
        2 tbsp olive oil
        1/2 cup egg white beaten

        • Mix together in a mixer the dry ingredients.
        • In a bowl mix the wet ingredients
        • Combine the wet into the dry ingredients and mix on medium speed for 3 minutes (scraping the sides if necessary)
        • Cover the bowl with a clean towel and Let rise for 45 minutes
        • Oil two 3" x 8" loaf pans
        • Transfer batter to the two loaf pans and cover again with the towel
        • Let rise while the oven preheats to 375F
        • Bake for 50 minutes
        • Unmold and let cool on a rack.
        Printable Recipe

        Tuesday, January 12, 2010

        Amaranth Black Bean Patties

        amaranth patties

        I am not sick of amaranth yet.  This will, however, be the last post on this minuscule seed for awhile. 


        I am on a mission to make my life both more nutritious and convenient.  My children and I are in school all day.  We all prefer brownbagging over scrambling to find something that we consider acceptable outside the home.  These amaranth patties are easy to take with you.  Pack them alongside a vegetable salad and you are in for a delicious lunch.  They taste great hot off the griddle or at room temperature the next day.  Here are some other make-ahead dishes you might enjoy at school or at work:

        Don't miss a single recipe--subscribe to Artsy-Foodie using the tool at the top right of the screen and receive Artsy-Foodie in a convenient email newsletter.

          amaranth tower

          Amaranth Black Bean Patties (makes 12)

          2 cups of cooked amaranth*, cooled enough to handle
          1 cup cooked black beans
          2 tbsp green onions, chopped
          1/4 cup cilantro, chopped
          1/2 cup Mexican cheese, shredded 
          1/4 cup egg whites
          2 tbsp pepitas (optional)
          1/2 tsp ground cumin
          1/2 tsp ground coriander
          1/2 tsp sea salt
          Olive oil for griddle

          *The amaranth should be cooked according to packaging.  I use a 1:1 water to amaranth ratio. Otherwise it cooks like rice:  simmer covered for about 15 minutes, then turn off the heat and set aside for 10 minutes before fluffing with a fork.

          • Mix all the ingredients together in a large bowl
          • making amaranth patties
          • Take 1/4 cup of the mixture and form into a patty.  Continue with the remainder of the mixture until until it is all gone.
          • Heat a griddle on medium-high (400F)
          • Coat with olive oil
          • Gently place patties on the griddle without overcrowding.
          • Fry patties for about 6-8 minutes on each side.  Handle them carefully when the first side is ready to be flipped so that they don't fall apart.  They should be golden and feel somewhat firm when tapped with the back of the spatula.
          • Serve right away with some guacamole or fresh salsa or let cool and refrigerate
          Printable Recipe

            Thursday, January 7, 2010

            Amaranth Continued...Spinach Amaranth Herb Salad

            amaranth salad in bowl

            In continuing with my Amaranth exploration, here's a lovely, refreshing salad that will bring some much needed sunshine to gray days of Winter.  My family loved this creation so much they asked me to make it again before they were even done with the first batch.  I've put it on my list of convenient lunches to take with me to school this quarter.  I might throw in some more vegetables and some sheep feta.  This way I can feel good that I am eating  healthy even when away from home.

            amaranth salad 2

            Spinach Amaranth Herb Salad (serves 6)
            Inspired by Tabouleh, this salad is refreshing and delicious.
            As an alternate instead of the fresh herbs you can use 1/4 cup of dry Ghormeh Sabzi herb mix (available at middle eastern grocery stores) but still include the fresh chopped spinach.


            2 cups amaranth
            2 cups of water
            1/2 tsp sea salt
            1/4 cup olive oil
            1/4 cup fresh lime juice
            1/4 tsp ground cumin
            1/2 tsp ground coriander
            1 garlic clove, minced or crushed
            1/4 cup chopped fresh parsley
            2 tbsp chopped fresh mint
            1/4 cup chopped cilantro
            2 cups finely chopped baby spinach

            • Simmer covered on a low flame for 12 minutes.
            • Transfer to a bowl and set aside to cool slightly.
            • In a small bowl mix: olive oil, lime juice, cumin, coriander, garlic and chopped herbs.
            • Mix the salad dressing in with the cooked amaranth and chopped baby spinach
            • Refrigerate for at least an hour to let the flavors blend together.

            Printable recipe

            Monday, January 4, 2010

            Amaranth: packed with nutrition

            mortar amaranth

            Amaranth is commonly referred to as a grain because of its appearance and nutritional profile.  It's actually not a grain at all:  it's the seed of a beautiful flower called Amaranthus, said by gardeners to be very easy to grow.


            Both leaves and seeds are edible and enjoyed in various parts of the world.  The name of this wonderful plant comes from a Greek word that means "everlasting."  The plant itself comes to us from the Aztecs, however.  There are many legends attached to it, and it was an integral part of the Aztecs' diet and religious rituals. 


            photo courtesy of: Wikimedia Commons


            amaranth grain closeup

            Amaranth's nutritional pedigree reads like manna from heaven. It is bursting with important nutrients--just take a look at its nutritional profile:


            1 cup of Amaranth uncooked contains:
            26g of protein
            13 g of fiber
            31% Daily values of Calcium
            82% Daily values of Iron
            14% Daily values of Vitamin C


            The protein in Amaranth contains both lysine and methionine which makes it an especially good source for vegetarians. It contains no gluten (yeah!) and is a good source of vitamin E (tocotrienols).


            Amaranth needs to be stored in an airtight container because of its oil content. I keep mine in a jar in the refrigerator. I try to use it within three months because the oils can go rancid if kept much longer. The good news is: it's delicious and very versatile.   You should have no problem eating it often. It can be popped like popcorn, cooked like grits, and transformed into delightful patties-- the list goes on and on. You can also add Amaranth flour to your baked-goods in moderation.  I would start by replacing 1/4 cup of your flour mix with it.   It's a great binding agent so too much will turn your bread gummy.


            This week I will be sharing two recipes for Amaranth.  
            Today's recipe is Popped Amaranth Cereal with Sesame Seeds and Crystallized Ginger

            amaranth cereal with ginger

            This breakfast or snack is packed with wholesome ingredients.  It comes together in minutes and is such a nice change from a bowl of porridge.

            Coming up in my next post:  Spinach Amaranth Herb Salad


            Don't miss a single recipe---subscribe to Artsy-Foodie using the tool at the top right of the screen and receive Artsy-Foodie in a convenient email newsletter.

            amaranth cereal ingredients


            Popped Amaranth Cereal with Sesame Seeds and Crystallized Ginger (makes 1 serving)
            One of my daughters doesn't like milk of any kind, so she enjoys hers with a little bit of
            orange juice. It can also be altered for a vegan diet by choosing one of the vegan milk and sweetener options listed below.

            2 tablespoons of Amaranth Seeds
            1/2 tsp cinnamon
            1 tbsp sesame seeds
            1 tsp of crystallized ginger, minced
            sugar, honey or agave nectar to taste (optional)
            1/4 cup milk, soy milk, almond milk or orange juice


            • Heat a thick-bottom pan to med-high temperature.  When a drop of water energetically dances in the pan you are ready to add the amaranth.
            • Add to the pan 1 tablespoon of the amaranth and stir.  It will start popping soon after.  You'll need to have a lid to prevent the seeds from flying all over the place.
            • It only take seconds and they burn fast-- keep a vigilant eye and transfer to a bowl as soon as most of them have popped. Then proceed the same way for the next tablespoon.
            • Add cinnamon and sesame to the bowl with popped cereal and mix well.
            • Then sprinkle the minced crystallized ginger. Add the sweetener if you are using it.  
            • Finally,  pour your milk of choice over the whole thing and serve.
            Printable Recipe


            Breakfast is Ready!
            Related Posts with Thumbnails