Thursday, July 31, 2008

Candied Orange Muffins with Rosemary

Candied Orange Muffins with Rosemary


Now that I'm left with quite a few candied orange sticks in the house, I have to find clever ways to use them in my cooking. The kids and I feasted on a few plain ones, and then had some more dipped in chocolate. It was all nice, until the sugar buzz kicked in and I started running laps around the kitchen. My children were quite entertained by their mother's unusual twitchy high. They miraculously seemed immune to the effect it was having on me, and I had to wonder if their tolerance is not a sign of how poorly I monitor their sweet tooth. I am of the philosophy that taking it away only makes them crave it more and I refuse to be the food police. What I do is provide ample healthy choices, nutritional information, as well as alternatives and most of the time they make the right choices. Anyway, back to the candied orange sticks... I decided that a good way to start the day would be by baking a fresh batch of muffins. There is something delightful about the combination of rosemary and oranges. It's like two friends getting together after a long time living apart and picking up right where they left off: compatibility in every bite.

Candied Orange Muffin Top


Candied Orange Muffins with Rosemary (makes 12)

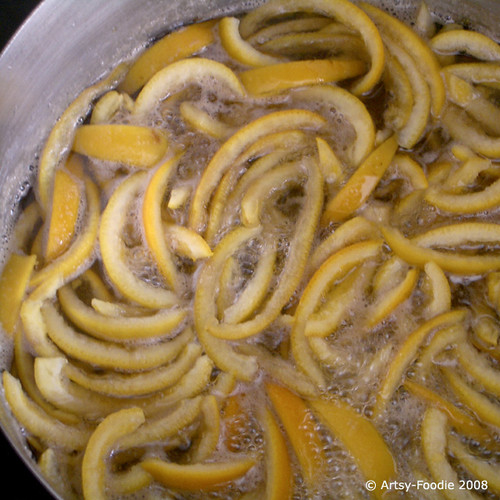
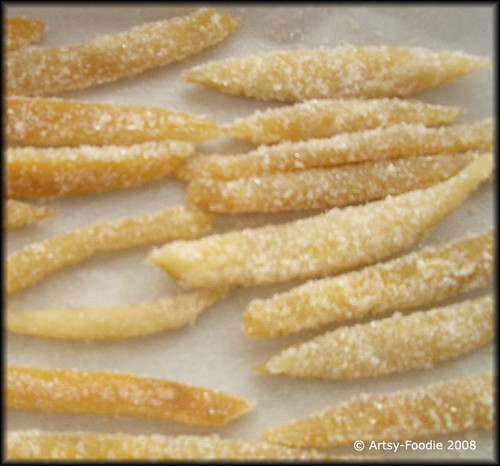
Here's a great way to use up the candied orange sticks you've made, or bought.
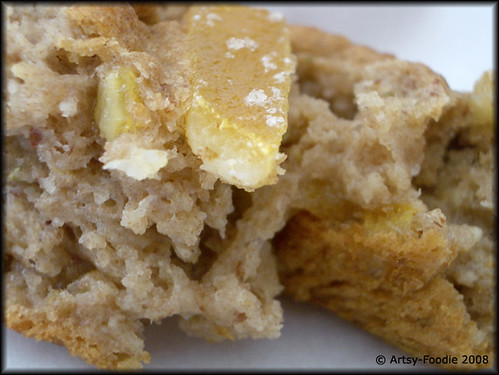
Those muffins are delicious, sweet and so moist. If you are not concerned about wheat-free, gluten-free requirements feel free to substitute the funky flours for 1 cup of whole wheat flour and 1 cup of all purpose, omit the xantham gum and continue as indicated with the baking powder and salt. However, if you like to experiment with new products the combination of those unusual flours might just delight you.

close-up candied orange muffins

Preheat oven 375F


In one bowl put the following wet ingredients and mix well:
Juice and Zest of 1 orange
1 cup vanilla soy milk or regular milk
1 tablespoon of roasted almond oil or regular vegetable oil
1 egg
4 oz of unsweetened applesauce
1/2 tablespoon of apple cider vinegar
1/2 tablespoon of finely chopped fresh rosemary leaves
1/4 cup of agave nectar
1/2 cup of candied oranges, chopped


Reserve:
12 1/2 inch pieces of candied orange


In another bowl combine and mix well:
1/2 cup almond meal
1/2 cup tapioca starch
1/2 cup of teff flour
1/2 cup of sorghum flour
2 teaspoon of xantham gum
1 tablespoon of baking powder
1/2 teaspoon of salt

Combine the wet ingredients into the dry ingredients. Mix. Divide into pre-oiled muffin pan. Top each muffin with an 1/2 inch piece of candied orange. Bake for 30 minutes or until cooked through (knife inserted in the center of muffin should come out dry).

Wednesday, July 30, 2008

The Pomegranate Plate That Started It All

candied orange sticks up close


It all started with a package, which showed up at my door: brown, unremarkable in all its markings. Just a box with my address staring back at me. I knew instantly what it was. My sister has been exploring pottery this past year. She has sent me pictures of all her works and each time my feedback goes like this: beg, beg, "make me something" beg some more "Don't you love me?" --insert a little more begging here if necessary... Either I have become one manipulative sister or she does love me because next thing I knew she announced that she was working on a plate for me and that I would receive it in this Summer. Finally, I am the proud owner of my very own pomegranate plate, handmade by my sister.


pomegranate plate

I am so thrilled with the new addition to my pottery collection that I have been pondering what I could make to showcase its beauty and honor it properly, and then it came to me: Candied Orange Sticks.

candied orange strips cooking

My sister loves them and I am pretty sure that we tried to make our own at some point in our childhood... but the memory is so vague (probably drowned in too much sugar) that I think I better let that one go. I'll just keep it simple: she loves them, I love her plate (and her of course), therefore it had to be Candied Oranges.

candied oranges on plate

My sister gets credited for cooking with me at such a young age that I had to prop myself up on a chair. I remember the mousse au chocolat (chocolate mousse) and cakes, and the croissants we made together. She had this book called: La Cuisine Des Petites Filles Modeles (The cooking of Exemplary Little Girls). Under her leadership, we set out to prove that we were "exemplary little girls" indeed.

candied oranges coated with sugar

I have great plans for those little sticks of sugar, orangy goodness... I'm having visions of cakes, cookies and pilafs. Oh, the possibilities... First things first, some of them are destined for a dip in some dark chocolate and then we'll see how many survive our hungry sugar-craving fingers.

So where can you find a recipe for Candied Orange Sticks? Here are a few links that will lead you right to it:

Food Network
Use Real Butter
Cooks.com

Tuesday, July 29, 2008

Kohlrabi, Broccoli Salad


Every once in a while you fall in love... And sometimes it's with a vegetable. Kohlrabi was a stranger to me a couple months ago until it started appearing in my CSA box. It visits me regularly, to my delight, and leaves transformed. Where did this vegetable come from? From the cabbage family, full of vitamins in all its purple glory. The outer part is quite tough, but once you free it of its coat this bulb is just scrumptious. It taste a lot like broccoli, except the texture is that of a radish. After your taste-buds adjust to the confusion of not knowing what to make of it, you'll enjoy its crunchiness and slightly sweet flavor. I eat it raw, cut up into sticks with some hummus or shredded in salads. Either way, it's love in every bite.

Kohlrabi, Broccoli Salad (serves 4 to 6)

In a bowl combine:
2 cups of shredded kohlrabi (about 2 bulbs)
1 cup of shredded carrots (about 2 carrots)
2 cups of small raw broccoli florets (1 head)
4 green onions, sliced
1/2 cup of chopped parsley
1 cup of heirloom, colorful, cherry tomatoes, cut in halves
1/4 cup of pumpkin seeds

For the dressing:
In a jar with a lid combine:

2 tablespoon of tahini
1 tablespoon of fresh lemon juice
1 tablespoon of olive oil
1 clove of garlic, passed through a garlic press
3 tablespoons of orange juice
1 teaspoon of sea salt

Close jar. Give a good shake and pour over the salad. Mix well, check for salt, and adjust to taste. Refrigerate until ready to serve. This salad keeps well for leftovers the next day.

Monday, July 28, 2008

Blueberry and Plum Clafoutis


When I was growing up one of the many highlights of Summer was the homemade cherry Clafoutis my mom would make-- that and spitting out the pits into our siblings' faces when our "maman" was not looking... Traditional Clafoutis is made with pits, which adds a "je ne sais quoi" to this fine dessert. Since I haven't figured out what this "I don't know what" is, I leave them out.

Today, I opted for sweet blueberries and a sliced plum for added color instead of the more traditional cherries. The batter is super easy to put together and Sorghum flour substitutes beautifully instead of the traditional all purpose wheat flour.
I'm making this wonderful, light dessert another submission for SHF, hosted by Susan.


Blueberry Plum Clafoutis Serves 6

Ingredients:
2 eggs
3 tablespoons of honey
3 tablespoons of sorghum flour
1 cup of lowfat milk
2 cups of washed and picked through blueberries
1 sliced plum
1 tablespoon of Turbinado sugar


Directions:
-Preheat oven to 350F
-Oil a pie dish
-In a bowl mix energetically the eggs and honey. Add the flour and continue mixing, then incorporate the milk little by little.
-Put the blueberries in the prepared pie dish. Pour the batter on top and finish with the plum slices. Carefully transfer to the oven.
-Bake for 30 minutes and then sprinkle the sugar on top of the Clafoutis. Bake an additional 40 minutes or until set in the center. Let cool completely and refrigerate. Serve cold.

Saturday, July 26, 2008

Sweet Thing: Agave Nectar


Marc from the wonderful food blog Chefectomy suggested I speak a little bit about Agave Nectar since so many of my recipes call for it.

Agave nectar has been a favorite sweetener of mine for a few years now. It's a natural sweetener created from the juice of the Blue Agave plant. It behaves like sugar or honey in recipes, but is sweeter and more fluid.


I first started using it for health reasons. Even though I don't have diabetes, many sugars send my energy on a roller-coaster ride. Agave Nectar is low on the glycemic index and therefore has less of an effect on my blood-sugar. It's wonderful for its versatility and clean taste as well.

I reduce the amount of sugar in a recipe by about half if I am going to use agave nectar as a replacement. Some recipes, such as muffins, also require you to adjust the liquid level by 1/3 less to compensate for this sweetener's fluidity. However, in the type of baking I do extra moisture is welcomed, and I don't bother with that adjustment.
At times, I use it instead of honey. Keep in mind, that Agave Nectar will not provide the aromatic hint that is so delightful in honey, for that you still need the real deal. It's a great way to sweeten ice-tea and salad-dressings, because it blends right in.

For more information you can go to the Madhava honey website. It's sold in health-food stores, some bigger grocery stores and at Trader Joe's.

Here are some links to past posts that included this now famous ingredient:

Quick and Simple Fig Jam
Beet Daikon and Carrot Salad
Chocolate Almond Raspberry Muffins

Friday, July 25, 2008

Fig Chicken with Rosemary and Thyme


Last time my friend Marieke visited me she brought with her some exotic ingredients to experiment with. We've been friends for a long time and share many of the same passions. A perfect day for me is hanging out in my kitchen with her while working on a meal, chatting away about our lives. The meal always tastes better somehow, perhaps because of the ingredients, but most likely because of the company.


This chicken recipe is my idea of what to do with a wonderful ingredient she brought that day: fig granules, tiny dried up pieces of figs:


I decided to make a marinade for some organic, free-range chicken. The result was wonderful, fragrant and delicious. The marinade not only flavors the meat beautifully but keeps it moist as well. Fig granules are a great addition to any pantry. You can put them in your salad with some walnuts, over some nice creamy cheese, or simply on top of ice cream.

Fig Chicken with Rosemary and Thyme (serves 4-6)


2.5 lbs chicken parts, bones in, skin removed (optional)

In a bowl mix together:
1 tablespoon of minced garlic (about 3 cloves)
1 tablespoon of fresh rosemary
1 tablespoon of fresh thyme
Juice of one lemon + zest
1 tablespoon of agave nectar
3 tablespoon of olive oil
1 tablespoon of salt
2 tablespoon of fig granules

-Add the chicken pieces to the marinade in the bowl, rub it all over the meat, and refrigerate for an hour (no more or else the lemon will start cooking the chicken).
-Preheat oven to 400F.
-Cook loosely covered with foil in the oven at 400F for 30 minutes. Lower oven temperature to 350F and continue baking for another 20-30 minutes. Check for doneness with a meat thermometer. Let rest for 5-10 minutes before serving.

Here's a link to USDA website on poultry temperatures for doneness:
Is It Done Yet?
If you have trouble finding fig granules in your area, you can find them online by following the "fig granule" link above.

Thursday, July 24, 2008

Dishes Inspired by Others


I travel every day. Blogs allow you to experience different flavors, cultures and ideas. Food blogs offer culinary sightseeing without having to leave your office or home. Need a break from the guy in the next cubicle or your cherub-like children? Click to an Italian blogger's site and you are in Rome licking your gelato. Short of catching a plane, this does the trick for me as I explore the world created by other bloggers.

Food is always a great destination. The picture above was composed from two of my recent visits to other food blogs. The Wednesday Chef posted a middle eastern pepper spread called Muhammara that I just couldn't resist. It's a thing of beauty: silky, crunchy, garlicky, slightly tart at the same time,and simply wonderful on bread. It would be excellent on a cheese-melt or any sandwich. Closet Cooking featured a wonderful, simple, lemony Hummus which is creamy, light and refreshing. I topped it with some smoked paprika and zaatar. After test-tasting both of them, I decided that the two should definitely meet over dinner tonight... they compliment each other perfectly.

Bread, Wonderful Bread


I take my bread very seriously. I am not sure when my love-affair with bread started but since I grew up in a culture known for its amazing array of doughy creations, I guess it comes as no surprise. Some people eat macaroni and cheese for comfort, I ate croissants, pain de seigle, pain de campagne, baguettes, battard, and pain d'epis with salty butter...

Life changed quite a bit when I had to get off wheat. My first worry was: "what about my bread?", but then I realized that I would enjoy this creative challenge. I love inventing recipes. I find it very therapeutic.

You can eat wonderful breads even on a gluten-free diet and never miss the wheat (at least I don't)-- All it takes the willingness to spend some time in your kitchen playing around and experimenting. After some research, I found out that most recipes can be converted to wheat-free or gluten-free. All you have to do is get up-close and personal with all kinds of gluten-free flours to recreate the perfect baking flour, and add 1 teaspoon of xantham gum per cup of flour to bind them together. Then you wave your magic wand and voila. No, actually you have to be willing to fail because that's what leads you to understand your palette better. I have had my share of flops or so-so breads but ultimately I have come up with some recipes that would satisfy any bread-lover.

The nice thing about making gluten-free breads is that a mixer is all you need. The process is much simpler, almost like making a batch of muffins that has to rise. I have a few recipes that can be made in a bread machine as well, like the one below. This bread is really dense and full of wonderful whole grains (I tend to like hardier breads- the white fluffy stuff does nothing for me). It's wonderful straight out of the bread machine or you can keep it the fridge and toast it in the morning. Either way, you will enjoy its wonderful texture and nutty taste.


Whole Grain Gluten-Free Millet Bread for the Bread Machine

Wet ingredients:
3 eggs
1 1/2 cups of water
2 tablespoons of agave nectar
1 tablespoon of apple cider vinegar
2 tablespoon of vegetable oil (I like to use roasted walnut oil)

Dry Ingredients: (combine and mix, with a whisk, all the flours in a bowl before transferring to the bread machine)
2 cups of brown rice flour
1/2 cup of sweet sorghum flour
1/2 cup of teff flour
1/2 cup of amaranth flour
1/2 cup of tapioca flour
1 tablespoon of xanthan gum
1 1/2 teaspoon of salt
1 tablespoon of active dry yeast
1/4 cup of raw millet grains

Proceed according to the manufacturer's direction for your bread machine. Mine needs the wet ingredients first and then the dry ones on top. Select the bread bake cycle with a medium crust or equivalent (Basic Medium on mine). Once the ingredients start to mix, give it a few minutes and check that there is enough liquid. The dough should not be dry, add some water if necessary until you get a slightly wetter dough (see picture for guidance). Proceed as usual with the cycle of your machine. This bread is great eaten warm straight out of the oven and even better toasted for breakfast the next morning.

Monday, July 21, 2008

Raspberry Muffins Redeemed


Remember the muffins I described in my flip-flops, well I revisited the troubling issue and the results are truly decadent. Good enough to submit for Sugar High Fridays which theme this month just happens to be berries. This event is being hosted by Susan over at Food Blogga. The mortar was dropped in favor of a fluffy producing combination of flours, more almond flavor and some chocolate chips. These were voted the best raspberry muffins by eager tasters, sure to become a family favorite. The dough is light and crumbly, full of delicate almond taste. The chocolate chips are the perfect ingredient to offset the raspberries' tartness and bring out their aromatic flavor. Fixing this past weekend's culinary mess was enough to make my day... It's the little things in life that make it just right.

Chocolate Almond Raspberry Muffins (makes 12)

Preheat oven at 375F. Oil muffin pan.

In a bowl mix together:
1/4 cup canola oil
4 oz unsweetened applesauce
1/2 cup agave nectar
1/3 cup of egg whites
3/4 cup of vanilla soymilk
2 teaspoon of almond extract

In another bowl, mix with a whisk:
1/2 cup brown rice flour
1/2 cup white rice flour
1/2 cup tapioca flour
1/2 cup sorghum flour
1/2 cup teff flour
1/2 cup almond meal
2 teaspoon of xantham gum
1 tablespoon baking powder
1 teaspoon salt

Other Ingredients:
1 cup of raspberries, torn into halves
1/2 cup semi-sweet chocolate chips
seedless raspberry jam

Combine content of wet ingredient bowl into the dry ingredient bowl. Mix until well combined. Add raspberry pieces and chocolate chips. Mix again gently. Divide batter evenly into muffin cups. Finish with a teaspoon of raspberry jam on each muffin top. Bake in the oven for about 30 minutes, checking for doneness (knife inserted in the middle should come up free of batter). Let cool for ten minutes.

Flip and Flops in the Kitchen


Well, 10 lbs of raspberries later and I am afraid that I do not have much show for it except a lot of lessons. I have had more flops than flips in the kitchen this weekend. The custard, the jam, the muffins, the almond-raspberry pudding never made it through my harsh criteria of blog-worthiness. Some of it was okay though, but none was excellent. I could blame it on the kids, the dog or my husband, but the truth is the dog can't be blamed because we don't have one, and the kids and husband are just perfect.


So here goes:


The custard was made with soy milk and agar agar. The end result was too thin and too blend. The raspberries which had simmered in the soy milk, honey and other flavorings were not enough to carry the taste through once the mixture solidified. Then, I mixed some of the homemade jam with fresh raspberries and poured it on top of the custard. That part was kind of nice, except the seeds got in the way and the abundance of flavor from the jam pointed an accusing finger at the custard. There was no chemistry between those two. The judges voted them out. Sorry, there is no room for mediocrity here. Thank you for playing. Harsh, I know.

The jam was pretty good, a little runny which was fine for my purposes-- but those seeds... I couldn't forgive. When you have to lean over for the floss every time you bite into your jam infested bread there's just no point. Note to myself: use a sieve next time before sealing those pretty jars.

The muffins were not bad if you like to have bricks for breakfast-- I don't. The flavor was very nice, not too sweet. The raspberries came through nicely showing off their beautiful perfume but the texture was just too dense. When my teenage son, who's growing like a weed, declined to have a second one, I knew I was in trouble. Usually he'll eat the whole pan and ask for more. No wonder he's sprouted a full 6 inches in just the last six months... No thanks to this morning's muffins, though. So here is the thing about gluten-free or wheat-free baking: it's a tricky, fickle beast. A mixture of flour that works for one batch of muffins might turn into a load of bricks the next, when you cleverly try it with different ingredients. It's all chemistry, which I can't remember if I flunked or aced in college. I am having brick-muffin induced amnesia, now. Anyway, I did some reading up in my chemistry of cooking books and I think I might know where I went wrong. Seeing how I can get pretty obsessive about these things, I'll have to try them again. I am going for fluffy this time, hold the mortar.

The almond-raspberry pudding, what can I say: I ran out of floss...

Friday, July 18, 2008

10 lbs of Raspberries


This morning, we went berry picking with my friend R and her daughter. It was beautiful and sweet. We picked and ate. We ate and picked some more. Conversations were flowing over the bushes and time went by so fast. We came home happy with our beautiful red, juicy jewels. What do you do with 10 pounds of raspberries? So far, I have managed to make jam, a raspberry custard and a pie. Not bad for one day's worth of work. Funny thing is: I still have more than half of my box left. Any ideas?

Wild Salmon Salad with Dill


Summer nights call for light, cool and easy dinners. I love this fish salad: the flavors are clean, the dill is fragrant and the dressing keeps everything moist and balanced. Don't be tempted to use canned fish, using fresh fish makes all the difference in texture and produces amazing results. Leftovers are wonderful the next day for lunch over some good home-made bread.

I like to make this dish with fresh wild salmon baked in the oven with just a drizzle of olive oil, herbes de provence, and sea salt. I usually do this the night before and then refrigerate it. This way the salad can be assembled the next day. It doesn't get any easier than this; short of eating it raw, sushi-style but that's a subject for another post...

Dill Salmon Salad

Wild Salmon Salad with Dill (serves 4)

Ingredients:
1 pound of previously baked wild salmon fillet, skinless
1/4 cup chopped fresh dill
1/4 cup mayonnaise
1 tablespoon of garlic dijon mustard (regular dijon is fine too)
1 tablespoon of fresh squeezed lemon juice
salt and pepper to taste
crackers to serve it with (optional)

In a bowl mix the dill, mayo, mustard, and lemon juice. Add the fish in chunks. Mix well and season with salt and pepper to your taste. Keep it in the fridge until ready to eat. Serve with crackers or with a green salad.

Thursday, July 17, 2008

Tarte Tatin meets Blueberry-Almond Cake


Ever had an epiphany? The kids and I went blueberry picking. It's the beginning of the season and the berries were a bit tart. We pondered on what we should do with them. Ideas were thrown out: pie, pancakes or muffins and then my mind gravitated towards: blueberries-almonds, almonds-blueberries-hmmm... The marriage of the two seemed perfect.

Deborah Madison (I bow to her in my kitchen-I love her books and recipes-other deep bow), author of Vegetarian Cooking for Everyone, makes an amazingly delicious Almond-Pear Upside Down Cake. I turned to her for my recipe guidelines, altering it for my dietary requirements. The result was perfection in every bite-- tender, moist cake, crowned with caramelized blueberries. What is your favorite way to savor blueberries?

Tuesday, July 15, 2008

Flextarian Chicken

Grilled Chicken with Pumpkin Seed Pesto
I don't eat a lot of animal protein. I wish I could say it were for moral reason, but the truth is I just don't enjoy it that much. I see it as a necessary part of my diet and have evolved into what Michael Polan refers to as a flextarian (also spelled flexitarian--someone who eats mainly vegetarian but will include animal protein in their diets occasionally). I have found that I am able to enjoy it more in smaller quantities.

Eating meat less often allows me to indulge and only buy the highest quality available. I also flavor meats such as chicken with wonderful ingredients and sauces. Below is one of my favorite ways to prepare chicken breast. The marinate keeps the chicken moist during the cooking process and the pesto compliments it to perfection. However, if you are in the mood for a vegetarian meal don't hesitate to substitute tofu for the chicken tenders. It's excellent either way! My favorite part about the pesto is that I get to sneak in some Swiss Chard into Mr. Picky's diet (age 6) and he even asks for more.

Did you know that the average person in the U.S.A. eats about 59.2 pounds of chicken per year? That's more than double what our consumption was in 1970. Kind of makes you think, doesn't it?

What's your favorite way to prepare this popular bird?

Grilled Chicken Tenders with Pumpkin Seed Pesto (4 servings)

Marinade Ingredients:
1/4 cup fresh lime juice
2 tablespoons of soy sauce (gluten-free available at health food stores)
1/4 cup of orange juice
1 tablespoon of olive oil
1/4 -1/2 tsp of chili powder
1 pound of chicken tenders

Combine all the ingredients in a bowl and marinade the chicken in it for 30 minutes to one hour in the fridge.

Pesto Ingredients:
1 cup, well-packed, cilantro leaves and stems
1 cup of Swiss Chard, leaves only
1 tablespoon of Tahini
1 tablespoon of olive oil
1/4 cup of orange juice
1/2 cup of pumpkin seeds
1/4 cup of chopped scapes
1/2 cup of shredded parmesan cheese
Salt and pepper to taste

Combine in the food processor. Pulse until almost smooth. If need be add some more orange juice to thin down.

Serve with a fresh salad and some home-made refried beans or a white bean puree sprinkled with fresh chopped cilantro.

Monday, July 14, 2008

Wonderful Millet


I have discovered the joys of millet. Staring into my pantry, uninspired by our dinner options, my eyes shifted towards the large bag of organic millet I purchased a while back. I normally use it to add to my breads when I am looking for some crunch
but now that I have tasted the Cool-Aid, or millet in this case, and I am sold on the many possibilities that this little grain possesses.

Birds have had a monopoly on it for too long and I, for one, am ready to reclaim it as my pet grain. It is easy to prepare:
1 cup of the grain requires, 6 cups of water some heat and 45-50 minutes later you have a beautiful polenta like mixture.
You cook it like you would rice really--
I started by adding 1 teaspoon and a half of olive oil to my hot pot, then I added the grain. I waited until it was nice and toasty (popping sounds and fragrant smell) then added my water (you could do chicken broth instead). I brought it to a boil and covered it. It simmered for about 50 minutes (you might want to stir a few times during cooking so it does not stick to the bottom). Once it was cooked perfectly, I poured it into a strainer to remove any excess water. I plated it, salted it, added some good olive oil and finished with some cilantro for color and flavor (shown above with black beans and a swiss chard salad). It was the perfect consistency, creaminess, richness and dreaminess. I am on a quest now to explore the many possibilities of my new favorite grain (sorry Quinoa and Teff-- I promise to come back to you eventually).

Friday, July 11, 2008

Quick and Simple Fig Jam


My grandfather had them growing in the courtyard. They would soak in the warm southwest french sun in the Spring and release their sweet wonderful flavors in the Summer. I can't think of figs without thinking of his hands holding a pile of them or reaching out to pluck one off the old tree. I can smell their perfume when I visualize this scene and taste their wonderful flavors. Figs have the magical ability to bring back to me my grandfather and the cherished memories of the time we spent together during my teenage years.

Besides memories and great flavor, there are many reasons to feast on figs. Those little gems are rich in fiber and minerals, potassium as well as calcium. Personally, I don't need any excuse to eat them I love their grainy texture and delicate flavor. One of my favorite way to eat them is by making a simple jam. I enjoy fig jam on nutty goat cheddar and a piece of hearty bread, or spread on a warm cinnamon muffin (shown above). My recipe below is easy and quick. You can put it together while your muffins bake in the oven. I spread the jam on a plate to hurry its cooling off and then transfer it to the freezer for five minutes or so.

Fig Jam (makes 1/2 cup)

5 ripe figs, coarsely chopped
1/3 cup of water
2 tablespoon of agave nectar (or honey)
1/2 tsp of cinnamon
1/2 tsp of chopped crystalised ginger (optional)
1/2 tsp of vanilla extract
1/2 tsp of fresh lemon juice

Combine all the ingredients in a small pot over medium-low heat and bring to a boil. Simmer, uncovered, mixing every few minutes, until thickened to a jam consistency. Cool on a plate and refrigerate until ready to serve. It will keep for 3 days in the fridge. Serve with warm muffins or to compliment a really good hard cheese.

Thursday, July 10, 2008

Homemade Yogurt


Why bother with homemade yogurt? Let me start by saying that nothing compares with a good homemade yogurt: the luxurious creaminess, subtle tartness, natural sweetness, and perfect texture. I grew up eating excellent yogurt and fromage-frais (a thick creamy cheese eaten as a yogurt). The United States has quite a variety of yogurts as well. They come in mainly little plastic containers, with an array of flavors, sweeteners and ingredients.

My kids stopped eating yogurt when they realized that some of their favorite brands (and we are not talking brands marketed to kids here which are often the worst offenders) contained gelatin and other objectionable ingredients. Now, we are not vegetarians but the idea of animal collagen in their yogurt grossed them out. What exactly is gelatin made out of? Gelatin comes from a protein which is extracted from animal bones (pork, cows, horses), skins and intestines.

Add the fact that all those little containers add up to huge amount of plastic waste on our landfills and a decision was made to purchase our very own, shiny yogurt maker.

My first attempts were not that great. I followed the recipe on the instruction manual included with my machine which yielded mediocre, overly tart results. After some investigation I came up with my own recipe which includes:

42 oz of pasteurized 1% fat organic milk warmed to 113F (verify with a food thermometer). I take 1/2 cup of the warm milk out and mix to it:
5 tablespoons of nonfat organic milk powder
1 packet of yogurt culture (available at natural food stores and some supermarkets)

Then I combine that 1/2 cup back with the rest of the warm milk and whisk well. I divide the mixture into my glass jars for incubation. I like to leave it in the machine for 8 hours (however, every machine is different so you will have to play around with yours or follow the manufacturer's instructions).

I also learned the hard way that it pays to sterilize everything that will touch the yogurt mixture in a pot of boiling water just before making it (be careful with this process because it is so easy to burn yourself). Missing this step could cause the culture to die out. Also, making sure that the milk is at the right temperature is important for the same reason as sterilization.

I make soy milk yogurt as well, which taste like nothing I have purchased on the grocery store shelves (and I have tried probably every brand available at my local Wholefoods). It's wonderful, thick, creamy and almost as rich as a custard. The best recipe I have found for soy yogurt is on a vegan website: Bryanna's Vegan Feast

I use dairy and soy milk yogurts as dessert, snacks, and for salad dressings. My kids love them because they get to flavor their own with jams, lemon curd, berries, agave nectar or other natural sweeteners-- and they don't have to think about animal collagen as they savor every teaspoon. There's no doubt in my mind that making yogurt at home is well worth my time and effort.

Tuesday, July 8, 2008

Lovely Summer Salad


Every week I get a bounty of vegetables from my CSA (Community Supported Agriculture). I don't usually find out what I will bring home until I show up at the farm-- I love a good culinary mystery.

Here's what I brought home: two salads, swiss chard, beets, two different types of radishes, turnips, artichokes, broccoli, collard greens, scapes, garlic, edible flowers and snap peas. My first creation was a wonderful, refreshing, little salad made out of Beets, Daikon radishes and carrots.

Beet, Daikon, Carrot Salad(serves 6)

In a bowl combine:
1 cup of shredded Daikon Radish
1 1/2 cups of shredded raw Beets
2 cups of shredded carrots
3/4 cups of finely chopped parsley

Dressing

In a jar mix:
1 tablespoon of agave nectar
1 tablespoon of soy sauce (you can find Gluten-Free soy sauce in health-food stores)
1 tablespoon of dark toasted sesame oil
2 tablespoons of brown rice vinegar
2 cloves of garlic passed through a press

Close jar with lid and shake until combined. Pour over the salad and mix well. Refrigerate salad for at least 30 minutes. Serve nice and cold. It goes great with poultry or grilled fish.

Cream of Black Lentil Soup with Kale and Turnip Chips


I love soup. Lucky for me, no matter what the weather is outside, my family is always excited at the idea of having it for dinner. This one combines some of my favorite ingredients: lentils, Kale and some home-made turnip chips.

Black Lentil Soup with Kale and Turnip chips

for the soup:
1 tablespoon of olive oil
2 cloves of garlic, crushed
1 cup of finely chopped onions
1 cup of finely chopped celery
1 cup of diced carrots
1 tsp of cumin
1/2 tsp ginger powder
2 cups of kale leaves cut into thin strips (julienned)
8 cups of chicken broth (vegetarian broth okay)
2 cups of black lentils, picked over and rinsed
salt to taste
1/2 tablespoon garlic mustard (dijon is fine)
1/4 cup of finely chopped parsley

for the turnips:
2 tablespoons of olive oil
2 or more small turnips, cut into paper-thin slices
salt to taste

In a large size pot warm the olive oil for the soup. Add the garlic, until oil becomes slightly fragrant. Add the onions, celery, and carrots. Saute under medium heat, stirring once in a while, until mixture caramelizes a bit (light brown color) and add the cumin and ginger. Combine with a spatula. Add kale, chicken broth, black lentils. Bring to a boil and simmer covered for 45 minutes to 1 hour. Add 1/2 tablespoon of garlic dijon mustard (plain dijon is fine too). Carefully taste and adjust for salt. Blend the soup with an immersion blender until desired consistency.


In a nonstick pan on medium heat, add 2 tablespoon of olive oil. When oil is ready, add the slices of turnip in batches. Cook each batch until the turnip starts to golden on the edges. Turn them over for a minute or so on the other side. Transfer to a plate lined with paper towel and salt to taste. Those chips add a wonderful flavor to this soup-- You might want to make some extra ones for any leftover soup.

Serve the soup in a bowl and garnish with the turnip chips and some fresh parsley on top.

Saturday, July 5, 2008

What I do When I am not Cooking


As much as I love spending one on one time with my food, I have to admit that I do other things besides invent, explore, and discover recipes. Here's a picture of my latest art project an altered mini box (this is the top view). I started out with an Altoid box and then used a variety of materials to make it my own. I made a handsewn mini book to place inside.
This started out as a group project when some of my friends and I gathered for an informal art day. All of our kids made a box as well. There was so much creativity that the next day was followed by endless thunder and a downpour of rain worthy of the best deluge. Oh, wait... maybe that was the oppressive heat not the creativity.

Friday, July 4, 2008

Happy 4th of July!


Friends-Family-Good Food- Fireworks
Have a Wonderful 4th of July!

Thursday, July 3, 2008

Breakfast is Served


I am one of those people who goes to sleep longingly thinking about how wonderful breakfast will be. As I am saying goodbye to yet another day, the smell of fresh brewed coffee is alive and real in my mind. I think it's fair to say that there are two types of people in the world: the ones that dream up their breakfast while falling asleep the night before and the ones who could skip breakfast all together. Which one are you?

Baked goods have always been a big part of my life. I went straight from formula to Baguettes and Croissants. Overtime, my repertoire and nutritional knowledge increased and as a result I turned to whole-grains. So when I recently found out my health required me to erase wheat from my diet, it took some playtime to make it work for me. The strange fact is that I don't miss wheat at all. I am still puzzled as to how something so important to me could be so irrelevant now. This restriction has propelled me into a creative adventure, and in there lies my salvation: I enjoy a good challenge-- especially when it involves food.

Banana Chocolate Mini Muffins (makes about 21 mini-muffins or 12 regular)

Those muffins are delightful for a snack or breakfast. I make them once week. The almond meal gives them a feathery, delicate taste and the banana is not too overpowering. The flours used are Gluten-Free but it's always a good idea to check the ingredient list on the other components as well.

Oven
Preheat over 375F

In one bowl combine with a whisk:
1 cup Sorghum Flour
1/2 cup of Brown Rice Flour
1/2 cup of White Rice Flour
1/2 cup of Tapioca Flour
1/2 cup of Almond Meal
2 tsp of Baking Powder
1/4 tsp of Salt

In another bowl mix well:
1/4 cup of Canola Oil
4 oz of Unsweetened Applesauce
1 Large Egg
1/3 cup of Egg White (or another Whole Egg)
1/3 cup of Brown Rice Syrup (Or Agave Nectar or Honey)
1/4 cup of Vanilla Soy Milk or Regular Milk
1 tsp of Vanilla Extract
2 large very ripe Bananas, mashed to a smooth paste

Measure:
1/2 cup of chocolate chips

Combine the wet ingredients into the bowl of dry ingredients. Mix until barely combined. Add the reserved chocolate chips. Divide the batter into pre-oiled muffin pans. I used two regular muffin pans and filled the cups half the usual amount which yielded 21 mini-muffins. If you would rather have normal size muffins, fill a 12 muffin pan with the batter instead.
Bake for 20-30 minutes (depends on oven), checking after 20 minutes by inserting a toothpick in the center of muffin. It should come out clean.

Wednesday, July 2, 2008

From the Farm to my Table


We spent the day at our CSA yesterday. It was so beautiful and relaxing. The kids got the scoop on how things get done in the barn, a hay ride and the pleasure of fresh strawberries still warm from the sun.
I love getting this bounty of veggies every week: the colors, the smells and the taste of it all. This week lot was fresh spinach, beets, radishes, salad greens, turnips, cilantro, broccoli, artichokes, and snap peas. We snacked on the peas right away, focusing on their sweetness, the perfect crunch and how lucky we were to experience such delight. One of my daughters exclaimed: "These are so sweet, we should give those out on Halloween!" Won't we be the most popular house on the block...

Once we were back at home, I started to prepare my treasures for immediate use and food storage. It takes me about two hours every time to sort, wash, and prep our share for the week. I don't mind though and I have grown to enjoy the moment. This ritual is a wonderful therapy-- the perfect communion between myself and the food I feed my family.

Last night we feasted on:
Beet Salad, with Beet Greens and Walnut Sauce
Radish, Goat Milk Feta Salad with Olives and Parsley
Roasted Garlic Broccoli
Pickled Red Onions
Coarse Sea Salt, to taste

We all marveled as the conversation flowed freely around the food, our day, and the firework of flavors painting our plates. It was a perfect ending to an even more perfect day.


Radish Feta Salad with Olives and Parsley

This salad is wonderful: the embodiment of Summer. The cheese and dressing mellow out the spiciness of the radishes. You'll still feel a hint of it but it's delightfully balanced by the creaminess of the Feta.

1 1/2 cups of thinly sliced radishes
1/4 cup of goat (cow is fine too) Feta cheese
1/4 cup of slices Kalamata olives
1/2 cup of finely chopped parsley
1 tablespoon of fresh lemon juice
1 1/2 tablespoon of high quality olive oil

Place the radishes in a medium size bowl
Crumble the Feta on top
Add the olives and parsley
Sprinkle the lemon juice directly on top, then the olive oil
Salt to taste.
Mix well to combine and let stand in the refrigerator for at least 30 minutes.

Tuesday, July 1, 2008

Worthy Read

It has been hot as hell here, which means that about the only thing I feel like doing is reading. I have been making my way through Gluten-Free Girl by Shauna James Ahern--more like inhaling it actually. Shauna is the author of an awesome blog: Gluten-Free Girl. I am already 2/3 of the way done and I just started it two days ago. It makes for a very interesting read even for people who are not Celiacs. In the book, she discusses her journey from suffering without a diagnosis to embracing the discovery that she had Celiac Disease. She writes in a fun, light, friendly and yet passionate manner about her love for food, and how it was expended and not limited by her health. Seattle has a lot to offer food-wise and she brings it home to you in a delightful way.
Related Posts with Thumbnails